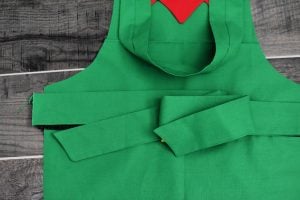
What’s the Project? When you make this cute elf apron pattern, you’re going to want to spend all of your time in the kitchen baking for Christmas! Two sizes available-make it for adults or make a children’s size for the little ones to wear while they help in the kitchen.
I’m usually a pretty strong subscriber to celebrating Christmas after Thanksgiving. I like to let Christmas not be drawn out too long so that it doesn’t lose its magic.
But I caved today while I was making this cute apron. This year is rough and we could all use a little cheer, so I busted out the Christmas and sewed up this cute little elf apron pattern.

It was a pretty nice afternoon.
And it’s got me excited for holiday baking…that’s one of my favorite parts of the holiday season.
This apron is available for adult sizing or children’s.
What might be really fun (and my little model in this picture was the one who suggested this) is to make a Santa apron in adult size and a cute little elf apron for the little ones. Or make matching elf ones.
Elf Apron Pattern:
I will be giving you sizing on this for adults (or teens) and kids. You can always adjust and aprons are quite forgiving sizing-wise, so don’t stress a ton about getting things perfect.
Pattern Pieces:
Print these before you get started:
Kid’s Elf Apron Pattern Pieces: Elf Apron Pattern Pieces for Kids
Adult’s Elf Apron Pattern Pieces: Adult Elf Pattern Pieces

Elf Apron Pattern
Supplies
- 1 yard green fabric If you are making the kid's size, you will need a little bit less.
- 2/3 yard 1.5 inch wide black ribbon
- 1 foot yellow ribbon (about 1/2 inch-1 inch wide)
- 1/4 yard red fabric
- red, green, black, and yellow thread
- pattern pieces (see above) and tape measure
Instructions
- Print out needed pattern pieces.
- Lay your green fabric out somewhere that you can easily measure and cut.
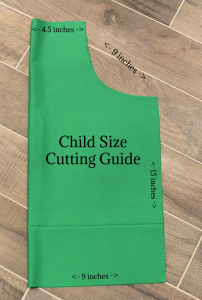
- Here are 2 cutting guides-one for adults and one for kids. Fold your fabric in half but only the amount you need to cut (like if you are making the adult size, you'll need about 27 inches to work with but need to save the excess so you can cut your second piece next). The measurements on this guide are accounting for the fabric being folded in half (meaning that the 5.5 across the top of the adult's, for example, will make the apron itself 11 inches across the top when you actually make it). Follow this guide to cut out the shape of your apron. Remember, it's an apron-if you are close to these measurements it will fit great! Here's the children's one.

- Here is the adult size one.
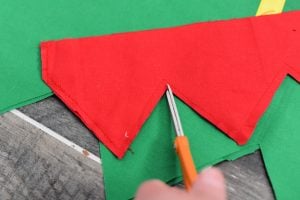
- Now you need to make the little zigzag across the bottom. Use the pattern pieces above to guide this.
- Next, you will need to cut your black ribbon the width of your apron (18 inches for the kid size or 26 inches for the adult). I like to cut it just slightly longer than my width-so maybe add about 1 extra inch.
- Cut 4 pieces of yellow ribbon each 2.25 inches long.
- Cut 2 pieces of your red fabric to make the collar. (From pattern pieces.)
- Finally, cut your ties and neck strap. The ties should be cut 5 inches wide by 26 inches long for the kid's size and 5 inches wide and 40 inches long for the adult's size. The strap should be about 5 inches wide and about 19 inches for kids and 23 inches for adults.
- Sew our red collar pieces together around all sides except across the top. Snip the sharp inner points just to the edge of the thread but not cutting through the thread, then turn right side out, use something sharp to push out the points, then press it flat.

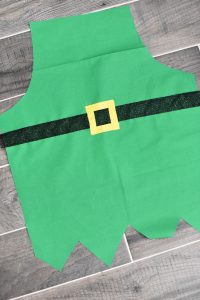
- Sew your black ribbon to the front of the apron from one side to the other just below the armpit curves. Sew a line across the top and across the bottom.

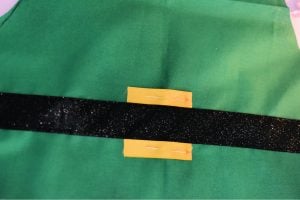
- Overlap your yellow ribbon pieces by placing them first above and below your black ribbon, then adding the two sides. Pin it all carefully in place (you could even glue it down a bit to really keep them in place-this part can be tricky). Sew a square around the inner edge of the four pieces and the outer.
- Sew your straps each along the long side and for the ties, along one short side as well. Turn them all right side out and press them flat.
- Place your red collar across the top of the apron and place your straps in place as well (see image).
- Place your other apron piece on top and pin everything in place.
- Sew all the way around, making sure to catch everything that you need to like the collar across the top. Leave an opening to turn it (I just did it in the side below the ties).
- Turn it right side out and push out all of the corners with something sharp (I use the ends of my scissors.)
- Sew the opening shut.
- Press everything flat.

Now, it’s probably time to bake something amazing, am I right?
These cute Christmas cupcakes are a favorite:

Or these are my all-time favorite cookies!

Pin It:


Leave a Reply