Years ago I used to make a lot of these hooded frog towels for friends as baby gifts, but for some reason I quit making them for a while. I have to say, when I made this I was reminded just how cute they really are. My 7 year old is begging me to make him one now. And the best part? I really could! These hooded towels are great for newborns clear up to young kids. Toddlers, preschoolers, everyone. So, here’s my frog hooded towel tutorial for you so YOU can make one too!
Isn’t this froggy cute?!?! OK, maybe it’s partly the adorable model too. I’ve also done a ladybug and a monkey and will introduce a new towel each month.

These towels take maybe 30 minutes to an hour max and cost less than $10. Not bad! And guess what? I have tutorials for a duck, monkey, dragon, ladybug and others coming in the future.
Frog Hooded Towel Tutorial:
What You Need:
Green bath towel (I got mine at Target and it cost about $4-5)
Green hand towel to match the bath towel
Small amounts of white and black fabric
Iron on transfer paper
Small amount of red fabric (I usually use fleece or felt but any will work)
Green, white and black thread
Frog Hooded Towel Tutorial:
To start, snip all the tags off of your towels and hand towels to get them out of the way.
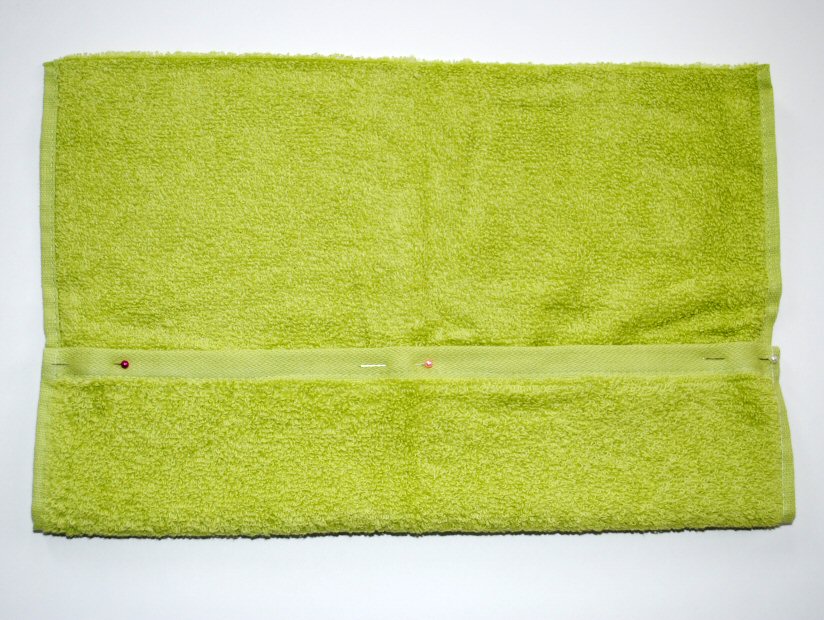
Then cut your hand towel in half the hamburger way (as in not the long skinny hot dog way, but the short, fat, hamburger way.)
Fold the edge of the hand towel over about 4 or 5 inches. Pin it in place and sew a straight stitch.
Simple enough right?

With the leftover half of your hand towel, cut out your green frog nose from the pattern piece you printed. Cut two and then sew them together leaving a couple of inches open on the top (the straight part) so that you can turn it. Then turn it.
Cut two:

Stitch together leaving opening on top straight part:

Turn:

Don’t worry about sewing that opening closed. That will take care of itself when you attach the nose to the towel.
Now do the same with your red fabric and the tongue pieces-cut two, sew them together leaving an opening at the top and turn it. If you are using felt you can just use one layer and not sew it.

Flip the hand towel over. Center your nose on the hand towel right along the stitch line you made previously. Stick the tongue up under the nose right where you are going to sew so that you will catch it in there too while you sew the nose on and then do a fairly tight zig zag to attach your nose.
See how the tongue is under there:

Zig Zag along the nose to attach it:

Cut out two white eyes and two black eyeballs from the pattern pieces. Iron them onto the iron-on paper and then iron them into place on your towel:

Now, using a very tight and fairly narrow zig zag stitch (applique), sew around them first in white on the white parts then in black on the black parts:

While you have your black thread in, add some little nostrils to your nose. Flip the nose out so that you can work with it. Then I just use the same tight zig zag stitch and go forward about an inch and then reverse over it one time. You could do this before you attach your nose to the towel if you prefer, I just like to wait until I have my black thread in anyway.

There’s your frog face!
Now, fold the hand towel in half with the face on the inside and zig zag the raw edges together to form the hood.

I like my frog to have more of a rounded head rather than pointy. To do this, fold your head like this:

And stitch a straight line across the top triangle part like this:

Then you can just snip that tip off if you want.
And now you should have a nice, cute frog head.

Next you need to sew your head onto your hooded towel. I have sort of a fancy way I like to do it with a little pleat that makes the towel wrap around the kid even better. You can do it that way or you can just center it on your towel and zig zag it in place. I recommend using a zig zag to keep it nice and secure.
Here’s how to do the the pleat if you want it:
In the center of the towel right where you want to sew your head on, make a fold like this:

Pin it in place and zig zag it together:

Now, sew your head on with a zig zag stitch like this: (see the pleat?)

And ta da! You have an adorable little frog hooded towel!

Really-your kids or your friends or whoever this is for-they are going to LOVE this!

See also:

Monkey Hooded Towel

Like I said, more tutorials for hooded towels coming…ducks, monkeys, dragons, ladybugs, owl, maybe a shark? Butterfly? Tiger? What do you want to see first? Other ideas? I think I will do a towel a month, so stayed tuned (like me on facebook, RSS, Twitter, Pinterest) to see more!


Angella says
The little girl I took care of as a nanny is getting ready to have her first, a little boy. I wanted to get her something a little extra special as a gift. I had gotten some hooded towels at the Saturday Market. Still had the card after about 15 years, but the lady that made them had passed away. I found you via Pinterest. Thank you for your inspiration.
With a little tweaks here and there, I have a great little gift.
The gift card that I will attach will say, “Every Princess needs a frog to kiss.”
I wish I could be at the shower. Looking forward to hearing about it.
Thank you,
Angella
Amber says
Oh cute!
Jaime-Lynne Houlihan Troost says
My daughter wants a Dory towel. Can you help?!? I’ve made about 10 of your other towels. Thank you so much for sharing!!!
Amber says
Oh that one sounds tricky! Trying to think….
Jessica says
I do not have iron on paper. Is it so important that I need to go buy some? is it just used to hold the eyes in place while appliqué on?
Amber says
It just makes them hold up a little bit better in the wash and things.
Corrie says
Do I need a special machine for the zig zag appliqué stitch around the eyes? Thank you for sharing!
Amber says
No, just set your machine to a really tight zigzag stitch.
Corrie says
Thank you! I made it tonight. I think next time I need to get a stronger sewing machine needle–I broke 3–but I love how it came out! Thank you for posting the tutorial.
Amber says
Oh yikes! Yes, it can get tricky sewing through all of those layers!
Mandy says
I just come across your page and spent ages looking at all your stuff. I love your blog. I don’t have a lot of experience but find so much fun in trying new things.
I absolutely adore these towels and will start making the little frog this weekend.
Thanks so much.
Joan says
I saw your cute towels on pinterest and pinned them, I am in the midst of making red angry bird, Elmo and the bunny for our Grandchildren, for Easter. What do you mean when you say cut the selvage edge under 3 moments. Do you mean 3 inches.
I am having so much fun making these, thanks so much for sharing your great ideas!
Joan
Amber says
Um, yup! Whoops. That means three inches. 🙂
gayan says
HI i love your frog and wanted to try it out . I need HELP i cant fit the nose and tongue part under my machine do you have any tip or tricks ? if i try to do the tongue only my machine makes a lot of loops under it
Amber says
To get it to fit under your presser foot raise your foot higher than its normal height. Do you know how to do that? Tere should be a lever next to it that will do it. Te looping om the underside would mean something’s off with your top thread. Try rethreading.
Kathy says
Hi Amber. Thank you so much for all of your tutorials. Crazy little projects is one of my most favorite blogs. I am finally making time for these cute hooded towels. Ive decided take on this crazy little project and try to complete each one of these towel tutorials a week. It will be so cute on my little one! Thanks to your sewing series, I am gonna have the cutest towel wrapped baby on the block:)
Amber says
Music to my ears! 🙂 Thanks so much and happy towel making.
Kathy says
Success! This was an excellent tutorial. It was fast and fun. Finished this last week and there was a happy little baby froggy running around the house all day 🙂
Sarah says
This is amazing – thank you so much for sharing! Mine took me ‘slightly’ longer, but I’m a bit of a novice. Instructions were really easy to follow. I’m making the frog and the duck for my friend’s twins.
Amber says
Love to hear that!
Barbara de Beer says
This is so smart, I ‘m going to make one for each off our grandchildren. (6)Thanks
S.A.
Amber says
I bet they’ll love them!
Rika says
I love this!!.. Thank you for sharing your idea! I can even add a little embroided image to the towel if needed.
Cheryl Hill says
What an adorable Idea and THANK YOU for sharing. I hope you are okay with me sharing your page and idea to my readers?!
I finished my first hooded bath towel but it was a VERY SIMPLE design and ran across yours in my search for other ideas.
Great job!!!
Amber says
Always! I love it when people share. 🙂
deb says
I made the frog towel for a sweet little boy, he loved it! My recent blog post about making it directs them to your blog and tutorial..thanks for sharing such cute ideas!
Amber says
Love it when I hear someone made a towel! 🙂
Jan says
I love this pattern and have made two frogs and have towels to do a monkey. The instructions are easy to follow and your pictures are wonderful. I have just one question? When you make the pleat on the large towel do you open it to the front or back? Thank you for these wonderful patterns. We are expecting our first grandson and have several great nieces and nephews who will be getting these as presents!
Amber says
I do it like this picture-does this help: http://3.bp.blogspot.com/-0uIm4javJMk/T4NlAq6TXwI/AAAAAAAABtE/Bl2jK10wWUA/s1600/Pleatfrogtowel.jpg
Jan says
I understand how to make the pleat but is the picture that you show, the back outside or the inside? I made one each way. I think it looks better if this is the outside but I think it wraps better if it’s on the inside. Thanks
Amber says
Oh ok-that’s the back of the towel. But I would say either way works. 🙂
Jan says
Thanks.
Judy says
Amber, forgive me for not understanding, but to attach the nose to the hood with the tongue intact, I have to sew through 8 layers of thick fabric? I can’t fit this under my pressure foot. What am I doing wrong?
Amber says
With my presser foot I can lift it higher than normal with the lever. Are you able to do that? Play around with yours and see. I have to raise it really high to get that load of fabric under there and then sew carefully to not break a needle.
Judy says
Oohhhh there is! New things to learn! Thank you.!
Shelley Condon says
Thank u so much. This is an awesome tutorial! I am a confidant sewer so I didn’t print pattern I just cut it Free hand. It is incredibly easy I loved it. Im making all my gifts this year so made the dragon for a friend’s bibs 1st birthday. It’s gorgeous. I made 2 frogs for my twin nephews and got creative and made A shark for my 2 year old. Thank u for this blog It has gotten me back to enjoying my creativity. Would love to see a butterfly at some point. Im all set to do a lady bug tonight. Thanks again
Amber says
I’ll try a butterfly sometime!
Cece says
I’m going to try and make a horse one! Awesome tutorial!
Kimberly says
I just finished making this for my toddler son. I made some slight modifications to make the hood bigger, it is SO cute! Thanks so much for sharing… can’t wait to try some other ones too!
Nikki says
“Cut out two white eyes and two black eyeballs from the pattern pieces. Iron them onto the iron-on paper and then iron them into place on your towel”
Iron on paper? Can you use freezer paper?
New to this (: thank you
Amber says
I use Heat N Bond
Kris says
I am loving this tutorial, but I am very new to sewing.. It is going well but I am about to start with the eyes and the transfer paper stuff. Is the purpose of the paper to stiffen up the white fabric or is it suppose to stick the white fabric to the towel for easier sewing?
Thanks for the help in advance.. K
Amber says
It just holds the eyes in place while you sew which makes it much easier.
Kris Wagner says
Thanks so much. 1 more question. No one at JoAnn Fabric knew what iron on transfer paper was. Is fusible web the same thing??
I made one without it and it turned out great but want to make more. Using your concept and going to make a gorilla for my nephew.
Amber says
Sorry, that’s a bad name for it. Fusing or heat n bond.
VSonntag says
Thank you for this great tutorial. The frog and monkey will make perfect gifts for my grandsons who are coming for a Christmas visit.
Lynn says
I love these towels and have three grandchildren who are going to love them this Christmas. I just made the ladybug and have the dragon and the bear all cut and ready to be sewn. Your directions are fantastic and the final products are darling. Thank you so much for sharing your creativity with us. I have a feeling that this will be my go to project for baby gifts and birthday gifts.
Amber says
I can’t tell you how much I love hearing that! I am always worried that I am going to confuse people with my instructions!
Cara says
THANK YOU FOR THIS PATTERN! It was fast, easy, and very very cute. I made the frog for my nephew’s baby shower, but I think that I’ll be making him some more animal towels after he’s born!! This might also become my go-to handmade baby shower gift for expecting friends as well 🙂 🙂
Amber says
Love hearing that!
Janae says
I’m so excited to try this! I bought my towels the other day to try two frogs and a ladybug! (One frog is for my new nephew and the others are for my baby girl on the way). I was wondering if felt could be used for the eyes and/or the iron on paper step skipped? Just seeing if I need to run one more errand before I start. Thanks! 🙂
Amber says
You could use felt definitely but I will warn you, it will pill and look a little more ragged after it is washed a few times. But, it would definitely work still.
Marsha says
I came across this tutorial a few months ago and pinned it with my baby nephew in mind. Tonight I finally made it! Your instructions were easy to follow, and yes, the tongue pattern was missing but I just did my own thing and it worked out fine. Thanks so much for sharing, this was a cheap, easy and fun Christmas present to make for him!
Amber says
Yay! LOVE to hear that! The froggy is still one of my favorites!
Jess Voigt says
I love the cut the frog but when I went to print out the patterns the tonge was missing in the print out
Amber says
I think I might not have included the tongue on the pattern. You can just cut a piece of red felt the size and shape you want it. Let me know if you need any other help.
Joy says
Really? How about you let us know approx. how long and wide it should be?
Amber says
It’s a towel. You buy a towel-any size and that’s what size it ends up being. The size doesn’t matter-get any size towel you want as long as you can find a matching hand towel.
SAHMoChubbies says
Great tutorial! The kids and I made a frog and a bunny (using frog eyes and the instructions for the ears of the monkey) yesterday for a friend’s children. Now they want me to make them some! lol! Instructions and photos were wonderful. As a side note, I stitched around the black line on the nose pattern and cut 1/4″ beyond that. I just pinned the printer paper to the fabric like you would any other pattern. Very, very cute!
Hannah Atkinson says
Just made my own!
http://missall-things-creative.blogspot.co.uk/2012/08/frog-hooded-towel.html
I love how cut it is!!
Hannah x
Liz @ Here's to Handy Andy says
Very cute, and what a great gift idea! Thanks for sharing at A Pinteresting Link Party! I can’t wait to see the other tutorials!
Sarah Jenkins says
This is so cute – thanks so much for sharing!
Sarah
{www.naptimedelights.blogspot.com}
Ginger says
Featuring YOU today! 🙂
Thank you so much for sharing!
Ginger @ gingeersnapcrafts.com
http://www.gingersnapcrafts.com/2012/05/take-look-at-you-my-favorites_17.html
Hani@Craftionary says
awww I love this.. So cute! 🙂 Thanks for linking up at friday fun party
Gourmet Freezer Cooks says
I was wondering if you were going to show how to do the other towels soon–I am especially interested in the monkey.
Thanks
Sarah says
This will be featured tomorrow at http://thewinthropchronicles.blogspot.com/
Congrats!
Misty @Creative Itch says
What a fun project!
Thanks for sharing @’Sew Cute Tuesday’.
I’ll be featuring you tomorrow, so be sure
to stop by and grab a ‘featured’ button!
Michaela @ coveredinmodpodge.blogspot.com says
So stiking cute! I can’t wait for the ladybug tutorial. I’ve got a little girl I’m working on baby shower presents for!
Rachel says
SO cute. What a great tutorial. I love these little hoodie towels. I vote for an owl or ladybug… I love animals so much any of them would be adorable… maybe a fox? Thanks for sharing. This is being featured this week at Lines Across.
http://www.linesacrossmyface.blogspot.com/2012/05/cure-for-common-monday-39.html
Charlene@APinchofJoy says
Congratulations!! You are featured this week on Busy Monday at A Pinch of Joy! I hope you will stop by and grab a Featured Button from the Button Box on the sidebar. Can’t wait to see what other projects you’ve been working on. Links are open — hope to see you again this week!
Sarah says
Oh this is so cute! Seriously! Thanks for sharing at The Winthrop Chronicles.
Gram999 says
Sooooo darling! My great-grandkids would love a pattern for a giraffe & zebra hooded towel. Thanks for the pattern.
Alexis @ we like to learn as we go says
This is too cute! I made one not too long ago, but it was much simpler. I think the frog is much cuter! 😉 I’m featuring you today on What I Learned Wednesday! http://weliketolearnaswego.blogspot.com/2012/05/features-and-adjusting-to-new-place.html
Gen says
This is great, I always look at those adorable towels, now I’ll be able to make them myself (one day, when I have kids…)! Great tutorial.
And your blog is adorable, and well organized! New GFC follower 🙂
Shatzi @ Love and Laundry says
I made hooded towels for my tow oldest when they were toddlers. It was so much fun! One of them was a frog, too. I love how yours turned out.
I love your blog! I’m your newest follower. =)
Ahna says
So cute! I love towel projects!
Jill ~ Jillify It says
Thanks for linking up your adorabe froggy towel at Jillify It! I would love it if you could add my party button to your party page. Thanks so much!
Jill
http://www.jillifyit.com
Hanni says
I love your project! Your tutorial is clear and seems easy to make this adorable towel. Thank you for sharing 🙂
Hanni
Alyssa says
This is so adorable and I love how easy it is. I will have to try to make one of these for my son! Thanks for sharing at Showcase Your Talent Thursday. I hope to see you there next week!
MsXpat says
How adorable and baby looks very happy so that totally sells it :0) Some times it is easy to be green.
Debbie McConnell says
Super cute!! I am going to give it a try for my grand babies.
Thanks for sharing with us on at the Lovely Things Thursday Linky Party.
Following you in all the locations I can.
Stop by and enter in a couple of giveaways I currently have going on.
http://www.scatteredmusings.net/2012/04/medley-lip-balm-tubes-reviewgiveaway/
cheapcraftymama says
This is the feature this week for Pin It and Win It Wednesday, thanks for sharing! Be sure to stop by and grab a button to show that you were featured!
Jill says
My little guy would absolutely looove this! Would love for you to come link up to the Pomp Party!
http://jill-createcraftlove.blogspot.com/2012/04/pomp-party-15.html
Jill @ Create.Craft.Love.
Lisa says
So, so cute! I think kids look adorable in these! I can’t help but take photos after every bath 🙂
atnumber29 says
this is so very cute! have pinned. thank you!
Jenny says
This is so cute…you have the best ideas! I just wanted to let you know I am featuring you over at Lovely Things Thursday!
Heather says
Adorable! I’m going to have to attempt one like this for my baby boy.
Christine says
Ok… you’re AMAZING!!!! This is the cutest towel EVER!
Thanks for sharing at The DIY Dreamer… From Dream To Reality!
Shantalle@lifestylesofthestayathomemom.com says
Look at that little guy, he is so cute! I really need to get the ol’ sewing machine out of the closet one of these days! You did an amazing job!!
Hannah says
Super cute!! I would love to see a monkey towel sometime in the future 🙂
Alison @ Oopsey Daisy says
Oh WOW!! What you don’t know is that my son is obsessed with kermit the Frog!! He would die if I made this for him. SO cute! Thanks for sharing at oopsey daisy!
Thrifty Miss Smith says
A fun project, and adorable little model, and a great tutorial to boot! This is a great post thanks for sharing it 🙂
Sara says
This blog is amazing Amber! I am loving every single post.