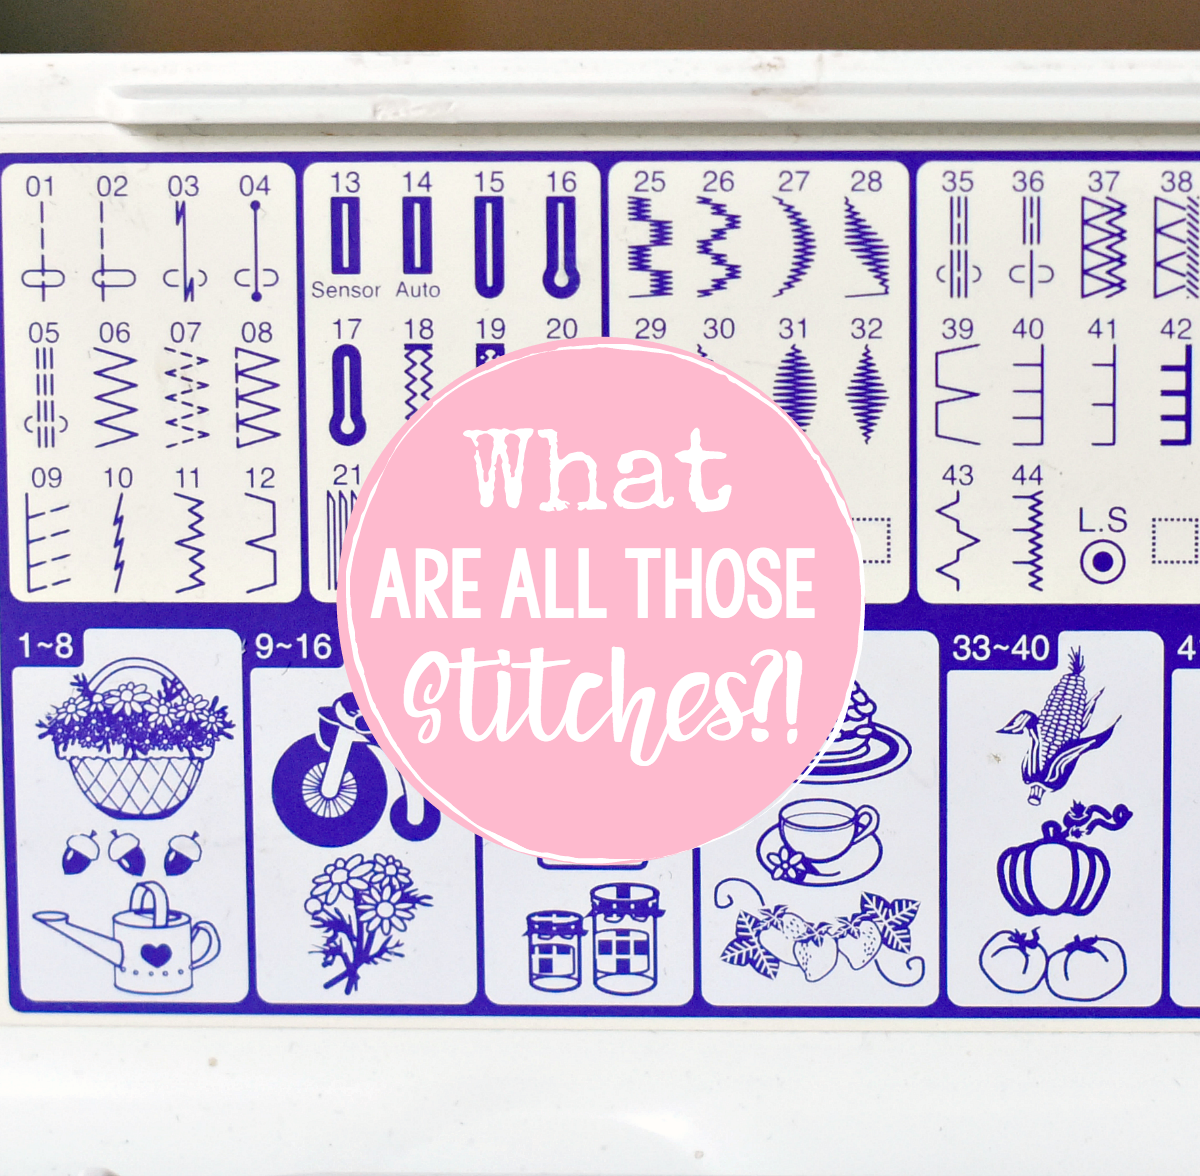
What’s the Project? Do you ever take a look at your sewing machine and wonder what in the world are all those stitches!? This guide to sewing machine stitches will take you beyond the straight stitch and zigzag and help you figure out what all those others are as well.
Have you ever taken a look at your sewing machine and the stitches available to be used and wondered what on Earth all those stitches do?
Me too.
Sewing machines vary in which stitches they offer. Some offer just some basic ones, some offer a ton. Mine has about 100 stitches and that can be overwhelming! So I am breaking it down and helping you understand your sewing machine stitches today.
The truth is that I am writing this post with my machine manual next to me, because frankly, I don’t use a lot of these stitches and don’t fully know what they are. So you are not alone.
Your machine will have different stitches than mine or might display them differently, but hopefully, this will help you figure out what some of those sewing machine stitches mean.
First of all though, I’ve also got a guide on how to use your sewing machine if you need to start there for some basics. Then look at the stitches more closely.
And once you’re done with those, this sewing dictionary might help you understand when reading a pattern.
Understanding Sewing Machine Stitches:
Here’s the first batch, and really, the main stitches that you will use while sewing.
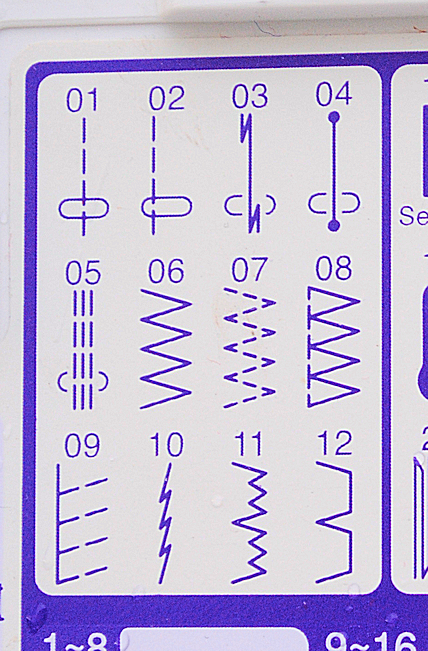
Basic Stitches:
1-Straight Stitch: Just your basic straight sewing stitch that you will use the majority of the time while sewing.
2-Straight Stitch with Needle Far to the Left: The will allow you to sew far to the left if needed.
3-Lock-a-Matic Stitch: This stitch will automatically knot at the beginning and end of your sewing without you needing to backstitch
4-Locking Stitch: This stitch will do an invisible knotting stitch at the beginning and end of your sewing. For when you need the knotting to be invisible.
5-Triple Stretch Stitch: For use when you need something to have a lot of stretch but also sturdiness. For example, in an armpit of a shirt.
6-Zigzag Stitch: Your classic zigzag stitch. (See Learn to Sew series for information on this.)
7-Multiple Zigzag Stitch: Use this stitch to finish the edges on a stretchy fabric that is inclined to pucker if you use the regular stitch. This will help prevent that from happening.
8-Overcasting Stitch: This is used to finish an edge. On my machine this is paired with a special foot-the Overedge Foot, that guides the fabric as you sew. Check your manual to see if you have this option.
9-Knit Stitch-This stitch if for sewing on knits and stretchy fabric. Sew along the edge of the fabric with a larger than normal seam allowance and then trim off the excess, unsewn fabric on the seam close to the stitches.
10- Stretch Stitch-Use for sewing on knits or other times when you need the stitching to be able to stretch. (More about this in my ebook.)
11-Blind Hem Stretch: Use to sew a blind hem on stretch fabrics.
12-Blind Hem: Use to sew a blind hem.
Buttonhole Stitches:
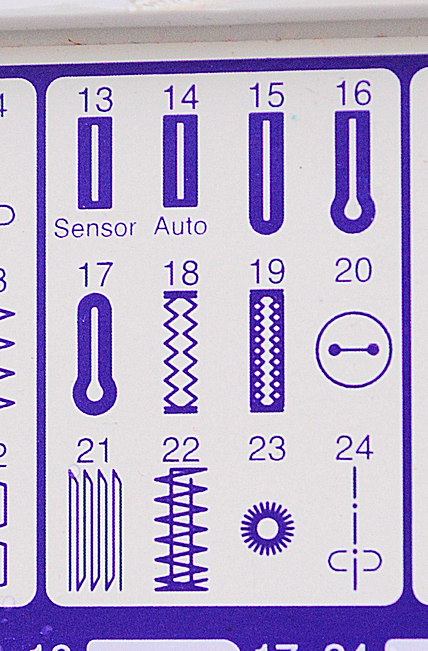
These are my buttonhole stitches-used for various types of buttonholes, eyelets, and openings:
13-Sensor Buttonhole: This will create a buttonhole just the size needed for my button if I place the button in a special foot that I use while sewing this stitch.
14-Automatic Buttonhole: This one will automatically create a buttonhole if I tell the machine what size the button is.
15-Round End Buttonhole: Used on medium weight fabrics typically.
16-Keyhole Buttonhole: This buttonhole is used on lightweight, delicate fabrics.
17-Rounded Keyhole Buttonhole: This one is good on medium and heavy weight fabrics and is great with bigger buttons.
18-Stretch Buttonhole: Use this on stretchy fabrics.
19- Knit Buttonhole: For use on knit fabrics.
20-Button Sewing: With this and a special foot, I can sew a button in place.
21-Darning Stitch: This will repair rips and holes.
22-Tracking: Reinforce place where extra strength is needed such as pockets and crotches.
23-Eyelet: Creates an eyelet hole.
24-Basting Stitch
Satin Stitches:
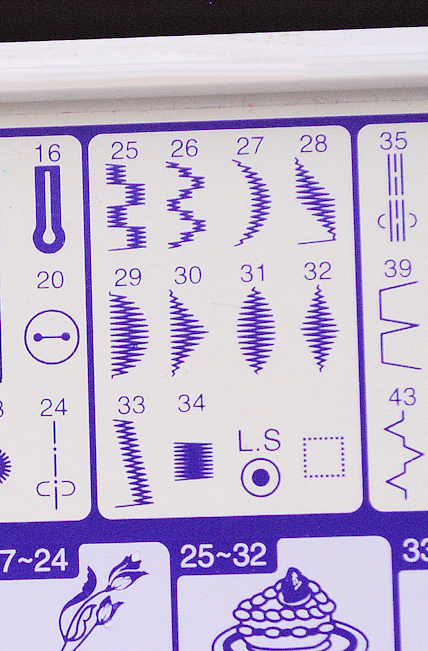
These stitches are called satin stitches and are created in a tight zigzag. These stitches are decorative, for the edge of a blanket or things like that.
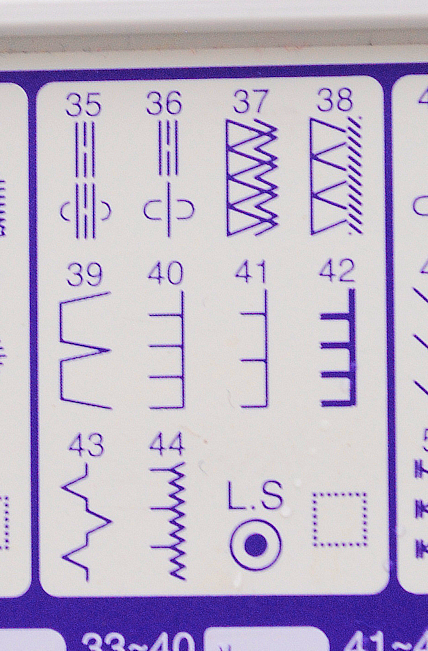
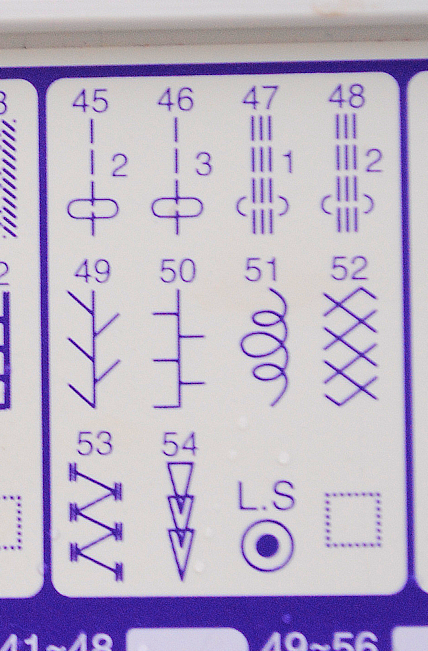
LS-Locking Stitch: Creates an invisible knot.
Edge Stitches:
These decorative stitches finish off edges of fabric:
35-Saddle Stitch-Not sure what this one is for. If someone knows, please help me out!
36-Saddle Stitch-Not sure what this one is for. If someone knows, please help me out!
37-Double Overedge Stitch: Use this stitch to finish the edges of fabric that tends to fray a lot.
38-Overlock Stitch: This stitch creates a finish along the edge similar to what a serger would create. Creates a more professional looking finish.
39-Shell Tuck Stitch: Decorative Stitch for edging
40-Applique Stitch: Use to applique things on and have a nice, finished applique edge.
Fancy Stitches:
My machine also has a whole bunch of fancy and fun stitches that can be used to decorate as you sew. See some of them above.
Did this help? Did you discover any sewing machine stitches on your machine that you didn’t know you had? I did!
You Might Also Like:
Pin It:

")


Smantha William says
Think this is among the most vital info for me. And i’m glad reading your article. But wanna remark on some general things, The site style is wonderful, the articles is really great, Good job, cheers
Linda Bryan says
The three-step zigzag is intended for mending. You can use it to essentially recreate fabric where the original fabric has failed, such as L-shaped tears. Put a piece of backing behind the repair area, then use the 3-step zigzag to build new fabric. If your machine allows you to adjust the spacing of stitches, set for widest stitches but rather close zigging; this will allow you to create a lot of new fabric where the tear has left a jagged edge. Don’t cut off the rough edge; incorporate it in the rebuilt area.
I use this for blown-out knees on jeans, for barbed wire tears on sporting clothing, for areas at armhole where the fabric has raveled and there is nothing to sew to when you want to repair a torn armhole.
Kimberly Soelberg says
I’ve had my Janome MC 6600 for 14 plus years and I never knew what the number three stitch was. Thank you for in lightening me‼️‼️‼️🥀 You explained what was what very well‼️ Thank you for posting🥀
ANN says
35 AND 36 LOOK GREAT IN AN EMBROIDERY THREAD TO DECORATE CLOTHES, PLACE MATS, BAGS ETC. ESPECIALLY ATTRACTIVE IN VARIEGATED THREAD
QueenOH10 says
Thank you. The Manual that came with my machine doesn’t show me the stitch names, but instructions tell me to use a certain stitch.
As a beginner this is super helpful.
Jennifer says
Thank you so much for putting this together. I just got the Janome Magnolia 7330 and the manual didn’t tell me what the stitches were for. this list was very helpful
Amber says
Happy sewing!
Sue says
Thank you so much. You’ve made me another happy, smarter Janome sewer.
I’ve printed this out and hung it on my wall for future reference!
Amber says
Love to hear that!
Julie says
I am curious about using satin stitches or fancy stitches to quilt. Do these stitches look the same on both the top and bottom sides of the quilt? or is the stitch pretty on the top only?
Amber says
They should look the same on both sides.
Catherine says
From Dictionary com:
Sewing. an overcasting stitch, especially one made with a strip of leather or a thick leatherlike cord. a spaced running stitch in contrasting or heavy thread, used mainly for decoration, usually along an edge.
Sarah Wunderlich says
The saddle stitch is used for sturdier stretch seams, decorative top stitching on knits. It’s a better looking stretch stitch as well.
The one next to the saddle stitch is a mock running stitch, used to simulate hand quilting. It is used with a nylon filament “invisible thread” in the top (sometimes bobbin, check manual) to create the look.
Kayte says
Hi Amber!
I am a new owner to a used Janome Horizon 7700. Can you tell me what the little squares made with dots mean? They are pictured next to L.S. Thank you!
Amber says
I’m not sure! Did you figure it out?
Kayte says
Not really! lol! Someone suggested they may for leaving a space in the stitch design. If I’m making any sense. I haven’t tried them, but I’ll just not worry about them right now since I have so much else to learn. 😉 Thanks for checking back with me!
Mary says
Super helpful, thanks! I recently got a Janome 2014. What machine is yours?
Amber says
I have a Memory Craft 9500
Mary says
AMEN! Feel like I’ve hit the jackpot with this list. Can’t thank you enough for the help with my first Janome machine.
Amber says
Love Janome!
Cholly says
Saddle stitches are used when piecing leather.
kolunaco says
Janome has some good sewing machines for beginners!
Rambox says
Started learning sewing & this post made me more interesting on this topic
Jean says
Correction please: the word that appears is SEN (not GEN). Sorry
Jean
Jean says
My sewing machine is a Kenmore 19233 (Janome DC5100),computerized. In the LCD window, for buttonhole sewing, the word GEN appears. Can you tell me what this means? Thank you.Jean
Amber says
Yikes! I have no idea! Sorry!
Penny M. says
Stitch #52 looks like a smocking stitch on my machine, which is generally used for sewing elastic in garments, but I have used it once as a decorative stitch. Not really what I wanted, but worked okay as the stitches on my machine are mostly just the basics. I wish I had a blanket stitch. I’m trying to figure out if I have a stitch on my machine to substitute for the blanket stitch on applique. So far…no winner. Clearly it will be something I want on a new or different machine in the future.
Valerie Mercer says
#35 & #36 are both topstich options used with invisible thread it gives a beautiful finish. #36 gives a handpicked look. You must try them out.
Amber says
Thank you!
Pollyanna says
Are there tricks to getting the stitches to work? When I try it, they look awful!
Pollyanna says
What do the little 1, 2, and 3 mean beside stitch selections 45 – 48? They all look like straight stitches to me. What’s the difference?
Amber says
I have no idea! Sorry!
Pollyanna says
Actually, I think I know the answer to my own question! I think they are used as spacers when programming stitches in sequence. Give it a try!
georgie scott says
Want to learn quilting on my machine. Help.
Amber says
Sorry, I don’t quilt at all!
Clare says
Thanks so much. My new Janome manual doesn’t explain many of the stitches, so this article is exactly what I needed. Gold dust!
Avalina Kreska says
Very helpful – thank-you
Jeannie says
Thank you for this it really ehlps
Alisha says
What are stitches 45-48 for?
Amber says
Actually, I am really not sure!
Rosemary says
Thanks this really helps
Shirley hale says
I believe your saddle stitches are the same as my homemade quilt look stitches.
Diane says
Loved the Blog. Very useful. Thanks for sharing all of this some of these stiches may save me time.
Margaret says
The “Print Friendly ” button does not seem to work.
Margaret says
Excellent guide. Thank you.
Adam Waddy says
I am not a professional tailor. I want to buy one mini sewing machine to stitch only old cloths. Please tell me which brand is good?
Amber says
My favorite brand is Janome.
wipaporn says
Thanks alot I buy Janome long time but can’t understand 😊
Teresa Marett says
Very helpful. I’m trying to brush back up on my sewing, so I can start a home-based business. 🙂
Jen says
Thank you so much for this very helpful pin. I tried the ‘number 3’ stitch (lock tite) yesterday and it’s much better than the reverse stitch.
Kat says
#20- the Baymax stitch lol
Kristen says
It will be of assistance!
Judy says
Hi Amber, thanks very much for giving this detailed information. I’m in the market for a machine. Previously I had a Sears (1980’s model) which I sent to goodwill. It still worked but was very heavy & cumbersome. I found a used Janome the same model as yours for $800 and wanted to ask how old your machine is & if you have had any issues with it. I would greatly appreciate any help you can give me in making a decision on purchasing this machine. Thanks.
Amber says
I have had mine for 10 years and it is a dream! Had to take it in once for some problems but otherwise just perfection.
Judy C says
Hi Amber, thanks for your prompt response to my question. It is nice to hear that you’re machine has performed so well for 10 years. I’m a little concerned about the computer touch screen on the machine I’m considering because it is very light and hard to read and can not be made any darker. Also, sometimes you have to touch the screen a few times before it performs the function you want and there is not tone/signal letting you know that it has taken. Have you had any problems with those functions. Thanks again. Judy
Amber says
Yes, sometimes I do have to touch it twice, but it hasn’t been a major problem.
Jatzio says
Thank you for your explanation. Recently bought it from Ch*na. There’s no manual, so this post really helpful!
Donna says
thank you so much. I have been sewing for years but did not know what some
of those stitches were for. Great help.
Donna
Leigh-Ann says
#9 is a 3pt zig zag. Its great for hems as well, it makes a stretchy stitch, less prone to breaking than a zig zag. I use it to sew elastic waist bands, and to hem t-shirts.
Nelly Robitaille says
Thank you for the information here, it help me to look a little deep into my machine and see how it really work. I am going to have a lot of fun now.
Lisa says
Thank you!!! I always wondered!!!
Miki says
I read this article in hopes of learning about what Janome’s can do…. just in case my current machine breaks;) Only problem, now I want a Janome! Great post!
Angel Flores says
Thanks for sharing this post, it has helped me so much!
Vanda says
Thanks for your concise explanations. Will be pinning a printed copy on wall above my machine for quick reference. Saves time not plowing through the inst. book.
Marlize says
So so helpfull, thank you!!!
Nicole says
Thank you so much for posting this! I recently got a Janome with a million more stitches than my 80s Singer had, and was completely lost. The handbook only helps so much.
I wanted to let you know that I’ve linked to this page on my blog, where I have a list of sewing resources. Let me know if you would prefer I remove this page…or if you have any other sewing resources you could recommend! Thanks again for these amazing tips!
http://restlessweaver.blogspot.com/p/sewing-resources.html
Patty says
Amber, thank you for posting this useful info! I’ve been sewing for a good number of years and just ignore some of those stitches. Now I know what they were really intended for
Jennifer says
I also have a Janome sewing machine i am trying to find out if it has amero stitching and if so which one is it.
Amber says
Sorry-not sure what you mean?
Michelle says
I think Jennifer (1/20/2015) meant merrow stitch. She might be looking for a serger or a cover stitch machine.
Vikki says
Stitch 40 is also called a blanket stitch. Sometimes a pattern will say, “blanket stitch” and that can be used to do it by machine.
Suzie says
Can you suggest a good machine for $200-$300 range? I used to make all my clothes 20 years ago, and I’m looking forward to getting back to sewing.
Amber says
I always recommend Janome. I think they have some good machines in that price range!!
Suzie says
Thanks! Better than a Brother? I think I want to go with electronic and don’t want a zillion extra stitches, but would like a nice choice and 1 step button holes, plus stretch stitches. Any particular Janome model(s) you would recommend?
Amber says
I don’t know for sure. I have a very high end Janome and I just feel like it is a really good quality machine. I haven’t tried others, I just really trust Janome
Ashley says
i just got the Janome Juno J1250. I had a budget in that same price range and this came to $335 with tax. I haven’t tried it yet but I’m excited to!
Darlene says
I worked at Sears for years selling Kenmore sewing machines and holding machine instruction classes. All my machines are Kenmore. The stitch selections are color coded and the accessories and parts are very user friendly. My first tank was a brother and worked great but the Kenmores had bells and whistles I love and use regularly. Button holes and applique work seriously easy and fun. They are also made by Janome. Lots of great machines out there.
Amber says
I love Kenmore too!
SUE says
I HAVE A JANOME DC5100 AND LOVE IT! II HAD BEEN USING MY MOTHER’S OLD NECCHI MECHANICAL MACHINE. THE JANOME WAS AN. EXCELLENT CHOICE FOR ME TONTRANSITION TO A COMPUTERIZED MACHINE. IT WAS NOT PRICEY. IS PORTABLE, CAME WITH LOTS OF FEET AND A NICE CARYING CASE. IT IS VERY. EASY TO LEARN TO OPERATE AND STITCHES BEAUTIFULLY. I MAKE A FEW CLOTHES, USING THE BUTTONHOLE AND ZIPPER FEET. MAINLY, I DO HOME DECOR AND HAVE EVEN MADE SOME NICE BEDROOM DRAPES. IT IS ALSO VERY QUIET. I WOULD RECOMMEND THIS MACHINE AS A NICE BRIDGE TO THE MORE EXPENSIVE ONES. THE DECORATIVE STITCHES ARE NICE TOO.
Camille. Milevskiy says
saddle stitch number 36 is meant to use as a hand look quilting stitch. You put your normal thread in the top of machine and put invisible thread in the bobbin. Thread the machine and bobbin as normal. Take your tension up to a much higher number and you will see the invisible thread being pulled up from underneath to make the second part of the stitch. It look nice when finished. But remember to put your tension back after finishing.
Amy Nelson says
The far left stich #2 is useful for sewing zips, particularly invisible zips. 🙂
Jocelyn Alfaro says
Amber , I’m so glad I opened your post. Thank you so much for the very helpful information. I was ignoring all these stitches and I thought I would not be able to use them. With your selfless sharing, I now appreciate I have these stitches on my sewing machine! God bless you my dear.
cheryl goss says
saddle stitch: This saddle stitch is formed with one stitch forward, two
stitches backward, and a fourth stitch forward.
You can achieve a lovely hand-worked look when
topstitching suits, blazers, jumpers and denim outfits with
the saddle stitch. i also read that it is very strong. i don’t know if this helps, but since your article was so helpful i wanted to see if i could answer your question. if not, just google “saddle stitch” and narrow it down from there. this answer is directly from janome. good luck…
Erin says
Thank you so much for this. This was SO HELPFUL and I am putting this on one of my pinterest boards to be able to look back on it. I am a NOVICE at sewing, but my parents gave me a machine a couple years ago because I crochet and like to add linings and backings. I have had absolutely no idea what anything really meant on my machine and I always just use the basic straight stitch. I really needed this!!! Thank you thank you thank you!!!
elizabeth says
I am very interested in learning how to sew. I have a sewing machine but don’t know how to use it. I’m having trouble finding a sewing class in my area. Is it possible to teach myself
leslie long says
Yes you can! If you have a Joann fabrics near you try them for classes. If not get some fabric , get your manual and just play. If I can teach my self to quilt you can learn to sew. Learn your machine first. Good thread and good fabric.. Good luck. Leslie
Milagros santiago says
Thanks a lot. I lke sewing and this is awsome
Becky Potter says
GREAT Help!
Sarah says
Really handy, I’ve recently won an Elna sewing machine, so this is a great help. Thanks
Kathleen Ely says
When I first started quilting 5 years ago and my brother bought me a Bernina I bought a gorgeous blue and green jelly roll. I sewed the strips together, then quilted it by stitching in the ditch, using a different stitch for each, as well as variegated thread. I learned which stitches were good for quilting and how the thread turned out for each stitch. My son loves that quilt!
Susan Ramsay says
Kathleen, I love the variegated thread, but as you may have learned, don’t use shads of blue on blue quilting. Some of the blue in the thread will match exactly the blue you have in part of the quilt, and it wil look like you forgot to quilt that section. You could watch your spool and pull off that part, but that would be pretty tedious!
stephany says
Amber, THANK YOU, THANK YOU, THANK YOU!!! I was just thinking of researching all.the different stitches on my machine. Question: Which Janine machine is this?
stephany says
Janome* darn auto correct!
Amber says
Janome Memory Craft 9500
Donna says
Great explanations! I have this exact machine!
Hazel Bartoszek says
Thank you so much ,I’ve just gotten the Janome 8900 this is really helpful.
Betty L. says
Amber, you are so generous to share your knowledge with us! This is SO helpful!
Debbie says
Wow, Amber! Thank you so much. I have some of those stitches on my machine and I never knew what some of them were for. I can’t wait to try them out!
Myki says
I love my Brother machine, I call her ” Beauty”. I have read that manual over and over like a favorite love story, it is heavily hi-lighted and I have written notes in it. Being a beginner sewist I make samples of new techniques. This is a learning journey that I look forward to.
Rebecca says
Brilliant! I need to create that, too!
Susan Ramsay says
Myki, good for you. so many of us never look at the manual, and it has so much helpful information.
Using the right needle and thread is VERY important when using fancy stitches.
Tavette says
My older machine doesn’t do half of these, but I’m saving your article and my next machine WILL have them. 🙂 Thanks
Tavette – S. Fla.
Megan says
Brilliant! Thanks for posting! Now I’m lusting after stitches your machine does that mine doesn’t 😉
Amber says
🙂
Brigitte Breuker says
This was awesome! I am teaching myself to sew and now I can use the proper stitch for whatever I am doing! Thank you!
nancy fischer says
SO HELPFUL!!
Diane says
Thank you so much.. it is has been a great help for me.
Amber says
You’re welcome!