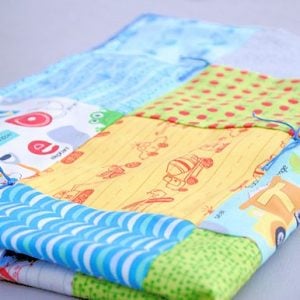
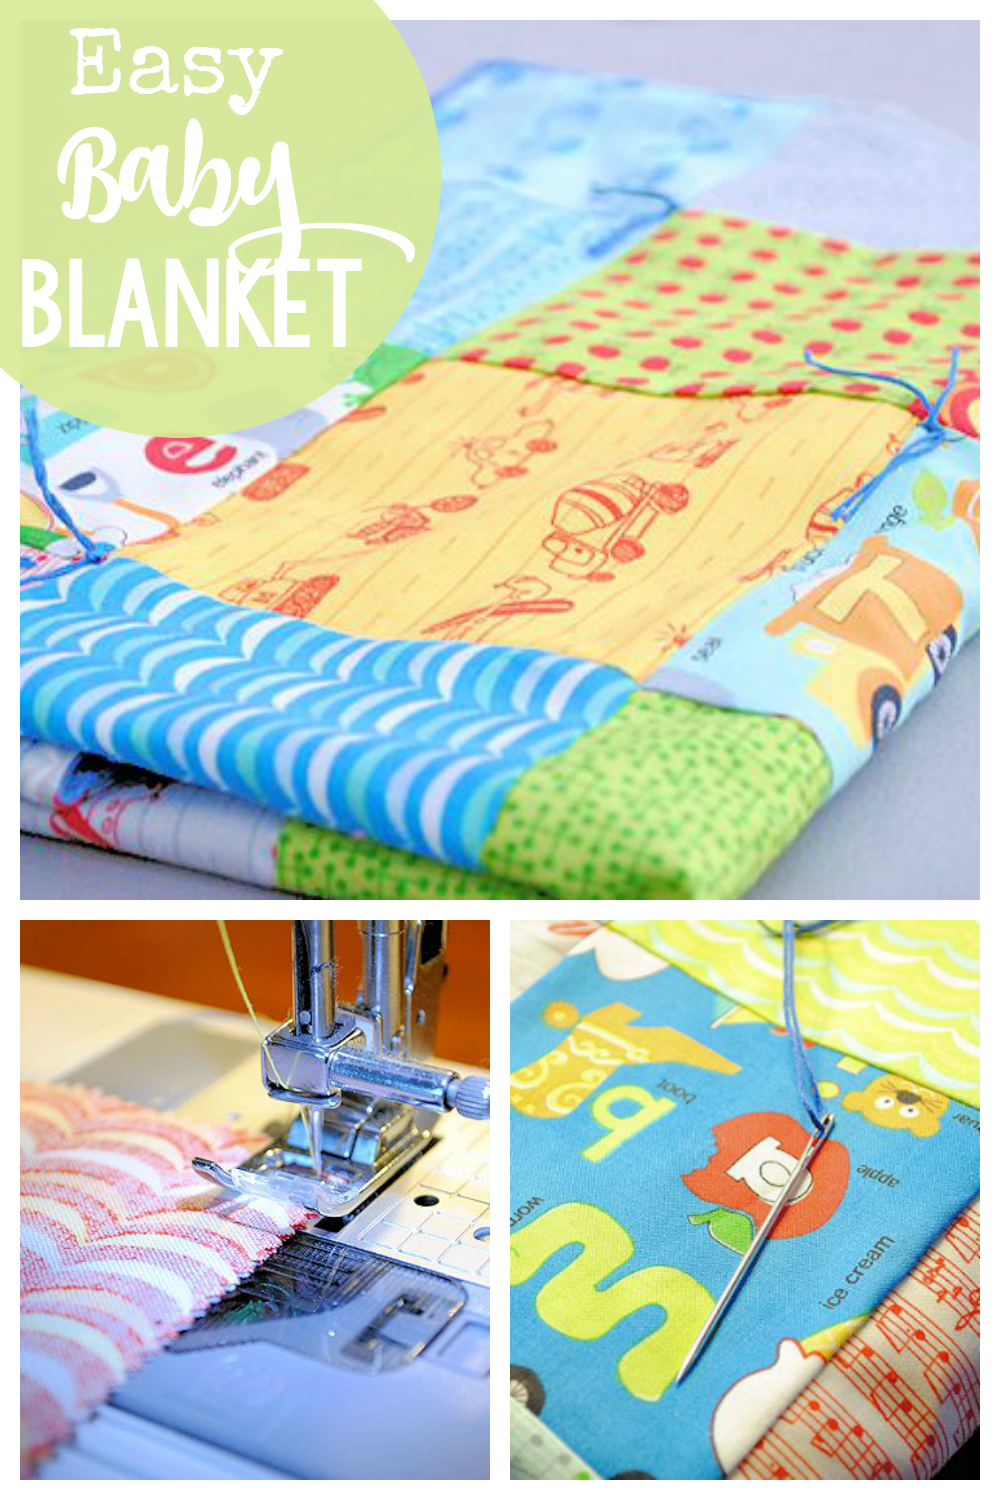
What’s the Project? If you’re looking for easy baby blanket patterns, you’re going to love this cute one! It’s a simple but cute blanket to sew for any baby-boy or girl! Turns out so cute (and it’s also a great way to use fabric scraps.)
I’m not much of a quilter. OK, I’m not even sort of a quilter-it’s not really my thing.
But I like to make these cute little baby blankets that are sort of, barely quilts. This is a very easy project and a good way to get started quilting or just sewing. It’s one of the easiest baby blanket patterns ever!

It’s pretty cute huh? It’s really pretty easy too-nothing but straight lines. I’ve made lots of these kinds of baby blanket patterns, but never with a charm pack and that cut down on lots of time!
This could also be done with fabric scraps as a great way to use your fabric scraps.
Easy Baby Blanket Pattern
Supplies
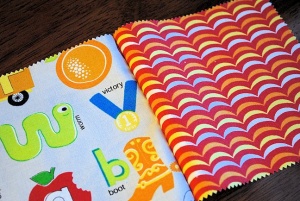
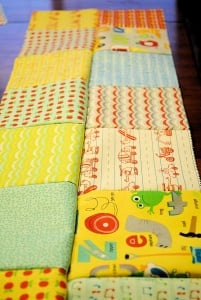
- 1 Charm pack A charm pack is a set of coordinating fabrics that are already cut into 5-inch squares. Mine is Apple Jack by Moda. You may also use any fabric you want cut up into 5-inch squares.
- 1 yard Soft fabric for the bottom I used minky dots, but any soft fabric will work.
- Embroidery floss Any color
- 1 Quilting needle
Instructions
- Assuming you have all of your squares cut and ready, you will need to lay them out and decide on the pattern you want them in. How many squares you have is up to you. This charm pack came with 42 square so the quilt is 6 columns by 7 rows.

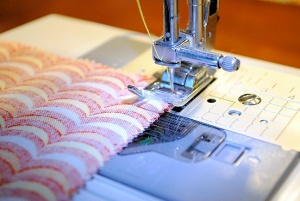
- Now you are going to start by sewing your rows together. So, start with your top row, put right sides of 2 squares together and sew them to each other using a 1/4 inch seam.
- Make sure it looks like this when you open them. Keep doing that with each square for your row until you have the row completed. Then set it aside and start the next row and do this to each of your rows.
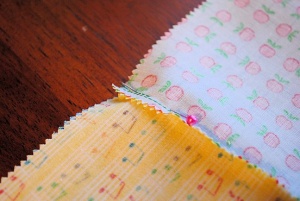
- Once you have all of your rows done, press them so they are nice and smooth. Now you are going to sew the rows to each other. Pin 1 row to the next by putting right sides together and matching up the seams. I pin them at each seam all the way down so there will be 7 pins.
- You want to be sure that your seams from one row are matching up with the seams from the other row as much as possible.
- Now sew one row to the next. Do that with all of your rows until you have a full blanket top. Press again.

- Now grab your minky dots fabric or whatever fabric you have for the bottom and cut it to the same size as your quilt top. With right sides together sew the minky fabric to the quilt top all around the outside edges leaving an opening of about 4 inches to turn it right side out. Turn it right side out and then topstitch all the way around the outside (this will also close your opening-make sure to fold it under nicely before you top stitch over it).
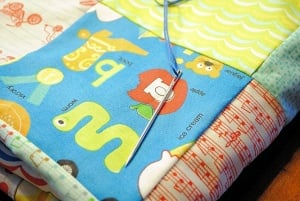
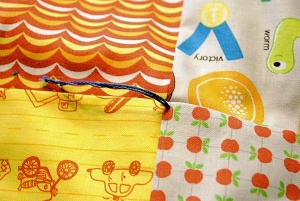
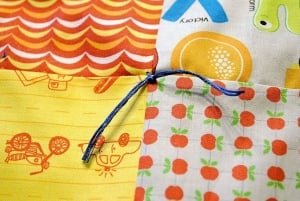
- Thread a quilting needle with embroidery thread.
- On the corners go down through the top.
- Go back up through the bottom and tie a square knot. I usually do this on every other 4 corner spot.


And that’s it! Not too hard!

In your search for great baby blanket patterns, I hope you love this one!
You Might Also Like:


Pin It:


Nicole says
This looks like a fun project to make! When you attach the front pieces to the soft back fabric, are you still using a 1/4” seam allowance?
Amber says
Yes
Amy says
Thanks for the great pattern! Do you wash the front once you have sewn all the squares together? I wasn’t sure if you washed the blanket after if the front shrank and distorted it?
Amber says
Ideally yes, but I am always too lazy to do that! 🙂
Peach fur fleece says
superb blog! thank you so much for sharing such nice tips to make baby blankets. your post is very useful for me to make a new quilt easily. thanks once again.
Carrotcake says
Lovely quilt! Thank you for sharing, I always wonder if it’s a good idea to leave loose thread on quilts where a baby might grab onto it and ends up chewing the thread. What’s your advice?
Amber says
If it makes you nervous you could actually just machine quilt it instead. Just do even some basic straight lines?
Audrey Fenstamaker says
Thank you so much for sharing this and helping me. I have like 6 I’ve wanted to make for 6 years now lol. Just never put my mind to it. I have a beautiful sewing room and tons of fabric. I wanted to ask you, do you really need not to add batting on the inside? Thanks so much!!!
Amber says
Not with the minky fabric-it’s thick enough itself.
Angie says
My mom used to tie her blankets at each corner with varigated baby yarn. Super cute!
jenelle says
this is a great tutorial. I haven’t sewed since home economics class in middle school and i am about to buy my first sewing machine tomorrow. this may be one of my first projects. It seems very simple and straight forward! I hope it comes out nice.
Amber says
Love it! Good luck to you!
Sandy says
I’m a beginner, but have made two rather complicated quilts. They were so complicated to me that I haven’t even thought about doing another until I saw your tutorial. I think I’m ready to face my sewing machine again. I like the idea of turning the quilt inside out, but how is this possible if you want to use batting?
Amber says
You can use batting and just sewing on with one of the layers of fabric.
Jane says
Do you sew it to the wrong side of the fabric so when you put the right sides together the batting will be inside?
Amber says
Yes
Jacque says
I’m soooo glad I found this tutorial. I had a blanket made like this when I was little, and now it’s my daughters favorite blanket. I wanted to make some for my boys and this is how I ‘thought’ it was made but wanted to confirm. Thanks for the tutorial! We love these blankets more than any quilt that has been gifted.
Nikki says
Thanks for this tutorial. I’ve been too intimidated to start a quilt I’ve been wanting to do but I think this might have given me the motivation to do a mini version as practice. Great instructions, very straightforward.
Lauren says
Hi,
Really like this tutorial. I’ve been asked by a friend to be a Godparent to their son and want to make it as a gift. I’ve bought a charm pack from Amazon but it looks a different material to what you’ve used, it’s kind of soft fleece, and bits come off it. Is this ok to use? Worry not and also worry the tires at the end will pull holes in the fabric? Any advice welcome! Thanks
Amber says
I think it should be fine!
Jo Anne says
I have been a sewer for many years and in fact taught sewing in the public schools. But quilting has never been my thing, too tedious and time-consuming. But now I am soon to be a first time grandma so am sewing many adorable projects for the new grandchild. I came across your easy-to-do baby quilt and was thrilled on how simple and quick this is to complete. I had never used a charm packet before……but no measuring and cutting…..I’m thrilled. Am looking forward to sewing this and thank you so much for making it so easy. I do think I will use a light cotton batting for a little extra warmth because we do live a a rather cold climate. Again…..THANKS!
Amber says
Bet it will turn out great!
Nena says
Thank you so much for sharing this wonderful tutorial. I am what you might call a “quilting dummy” I can’t cut a straight line for toffee. I am also a sewing beginner still too intimidated to do quilting or clothing. So far, I have stuck to simple projects like easy tote bags but am dying to move into quilting. The charm packs are something I will look into since they don’t involve cutting. Right up my alley! Also, since I only have a basic sewing machine, this project is perfect for me! I am thinking about adding on a ruffle around the edge. Since I don’t have a walking foot, no batting here works for me! The minky is nice and soft, I saw it the other day, perfect for the back of this quilt. I don’t mind the embroidery floss and with a little creativity you could attach homemade ribbon flowers to the floss to hide the knots and tails. Thanks for this tutorial!
Mary Jane Wetmore says
Sorry I keep having so many questions…I’m a very detailed person and a bit of a perfectionist 🙂 On the “tying” part….how exactly do you tie it? I have never done a tied quilt and don’t quite understand. Could you give me details exactly how to do the tying part? Thank you.
Amber says
Yep! It’s easy. Just go down through all the layers and back up and then tie a square knot, then snip the threads to about an inch or an inch and a half.
Mary Jane Wetmore says
I go down on e TOP layer and back up through the BOTTOM ?
Mary Jane Wetmore says
For the backing material…I do plan to pre-wash and I know all fabric shrinks when washing. You mention getting a yard. How much backing material (minky or otherwise) should I get so that after washing and shrinking, it will still be one yard? Thank you so much.
Amber says
If you want the finished product to be a full yard and you are worried about shrinking, get slightly more.
Mary Jane Wetmore says
Thank you, Amber…I may even get a yard and a 1/2 to be on the safe side!
Mary Jane Wetmore says
Also, I was wondering…have you ever made any of these blankets with just a cotton covering for the back, instead of flannel or minky? My grandbaby is due in April and I’d like to make this a lighter weight blanket but wondering if it would LOOK okay using a cotton backing (similar to the squares)? Thank you
Amber says
For sure you can do that. I sometimes add batting inside in that case though to give it a little more bulk.
Katie says
Where did you get your fabric pack?? I went to Joanns and they said they didn’t have anything like that. The gal working said they are phasing them out. Thank you!!
Amber says
Any quilting store will have them-locally or online.
Bernadette says
i am making this for my grandbabies twins 1yr grand daughter 3 years do i still not need the backing?
so i dont need the backing for 1year olds and 3year olds first time doing this
Amber says
Not sure what you mean? I just use a soft, fleecing backing. No batting though.
mary says
I am a quilter and this is a perfectly legit quilt. It is called a tied quilt.
All quilting is, is joining three layers of cloth, usually and upper a lower and a filler. However summer quilts which are lighter are often only 2 layers. Since we want a baby quilt to be light, layers is perfect.
Laura says
Love this easy instructions *s* I have a lot of material I plan to recycle , old jeans old flannel shirts and sheets (flannel and cotton) . These would make wonderful gifts.
Jenni Grif says
This is so cute! I’m not a quilter but I am going attempt this quilt. My 7th grandchild is due in Dec. Thanks for the easy directions.
Ami says
I love you design, and don’t wanna take away from this, and your wonderful blanket. However, I was wondering if I wanted to instead if I could sew along the blanket . And add the knocks as more as a design? Would this take away or not work?
Amber says
Yes you definitely can
Joan says
Hi! Amber, Love your tutorials, I have already made a few of your other ones and they are so easy to follow. I am looking forward to making this quilt, I haven’t made a quilt before and was so afraid to try it.
Thanks again, Joan
Noor says
Hi Amber! Can you have a 6 by 5 quilt because my charm pack came with only 30 squares?
Amber says
Of course! You can do any size
Mary says
I am so happy you offered this wonderful quilt idea. I have made and sold 100’s of flannel baby blankets, and will use the scraps to make the quilt. Thank you. Mary
Mary says
I am so happy you offered this wonderful quilt idea. I have made and sold 100’s of flannel baby blankets, and will use the scraps to make the quilt. Thank you. Mary
Karla says
I love the simplicity of this project! I have a bunch of receiving blankets that I was thinking about turning into a small quilt. I might give it a whirl if I feel brave enough to get the rotary cutter. Thanks for the great and easy tutorial. I will definitely use your idea with the charm pack, too!
Sharon says
Great tutorial….I think I will make it and instead of using floss to knot will do some free hand sewing/quilting to attach the top and bottom more securely.
LeAnn says
Great project!
Suzanne says
What an excellent tutorial! I like that it doesn’t have batting- my machine can’t handle that. This is going to come in handy, and probably very soon.
sonali says
Amber, did you pre wash the minky before sewing? Thanks!
Amber says
I’m naughty and never do but it is probably best practice.
Donna Bannister says
Nice tutorial. Why put the knots?
Amber says
It holds the top fabric and bottom fabric together.
Carolyn Fisher says
Such a pretty combination of colors! When sewing the strips together do you
Press the seams open or do you press them to the side, either up or down.
Thank you for sharing!
Amber says
I do side to side
Pam says
This is one darling quilt, I would have never thought of using so many different patterns and yet it is so adorable. Thank you for showing an ole chic some new tricks,
LaLa says
Really loved this. You really delivered.
My 10 year old granddaughter also thanks you. Gotta let you in on a secret: the backing fabric, you so greatly described, can be found at Wallmart. Happy Quilting
Tiffany Grace says
Amber, do stores like joanns sell charm packs or do you have any other websites that sell them? I didnt see a pack that I really liked on the site you used. Thanks!
Amber says
Yes, check especially at quilt stores.
Thérèse McGarry says
Hi Amber, I’m so glad I pinned your site. I live in Ireland and am a beginner quilter, your baby quilt will be my first project. Can you let me know how much material is in a “charm ” pack – I never heard this term before! Thanks in advance
Amber says
A charm pack has about 30 or 40 squares that are pre-cut for you. I think they are usually about 5 inches square.
Mary says
I would like you to send me an email when you have a picture of the Minkey backside.
Thanks, Mary
Mary says
So glad I found you. I will try it. Could you show how the backside looks with the ties and the minkey?
Thanks much. Mary
Amber says
Yes, I will do that ASAP!
Abigail says
I just made this blanket for my aunt and uncle’s little baby girl. It took me about 2 hours to cut out the pieces by hand (poor college student, can’t afford a rotary cutter and mat!). The next day I started the piecing the blanket in the morning and had it finished by early afternoon! So easy! It turned out great!
Diane Fletcher says
I love your blog. I have made several of your projects can not wait to try this blanket perfect for my great grand daughter,
Amber says
Thank you! I love happy readers. 🙂
Pam says
I wanted to make a quilt for my soon to be first grand-child. I find this one to be something I can do. Like other readers, I felt overwhelmed at the thought of quilting. I went into a local Quiltery to ask a few questions. They made it sound so difficult. They told me I had to use batting, and not to even attempt the minky dots. Was the minky dot fabric hard to work with? And I don’t see where I can use batting and still be able to make it like you instructed.
Amber says
Minky is a little hard to work with. It’s soft and slippery and a little stretchier than the other fabric which can make it tricky. If you try it pin a lot.
Pam says
Amber I finished the quilt and used the minky dot fabric. I loved making it and thought it was the perfect pattern for a beginner quilter. Thank you for the tutorial.
Amber says
Great to hear!
RobinfromCA says
Pam,
If you don’t want to use Minky a really nice flannel would be good. I would prewash the flannel though. I don’t prewash charm packs because they’re already cut so small and I don’t want the sizes to get stretched so they aren’t square. Quilting shops do have a tendency to use a lot of “quilter’s jargon” when you’re there. The first time I went to one I spent half the time on the phone with my friend who quilts asking questions like “What’s a fat quarter?” and “What’s sashing and how do I know if I’m going to do it?” I’m still a beginner (I started with my 2-yr-old grandson and now have a granddaughter) and this pattern is really nice and easy. Good luck! Nothing like grandkids to bring out the inner-quilting-grandma in all of us!
Pam says
Robin,
I just finished the quilt. I found it easy and fun to do. I will stay out of the quilt shops. Actually the people at Joann Fabrics were very helpful. I used flannel for the front, natural cotton batting and minky dot for the back.
Thank you for your encouragement. Looking forward to the baby coming!
Amber says
I love to hear that!
Denise Cox says
I made a super easy quilt using a pieced top, a flannel middle and backing . I put the inner flannel on top of one side AFTER I sandwiched the pieced top and other flannel together. Sewed around all four sides except for the opening to turn, then top stitched the top. I sometimes blind stitch the opening closed too. There’s a picture of it on my blog, it’s called Under Texas skies.
Lovely tutorial, thanks, Denise
Pei says
Do you need to pre wash the squares? I’m assuming they’re cotton or some sort of cotton blend so will they shrink after washing?
Amber says
I don’t prewash them-I just use them as they come. Not sure if that is how other people do it though?
Melis says
If you pre-wash, you will have a LOT of pressing to do before you start. You can use them without prewashing, this way when you wash it after it’s finished, it’ll poof up a little if they shrink and will add to the charm.
Brandi says
On the baby quilt how do I finish it? How do I connect the two pieces top and bottom together and the sides?
Amber says
It’s in there under step 4. There’s no pictures but it’s pretty easy. Let me know if you have questions about it.
Medbie says
This is so cute! What’s more, I actually think I could do it! It would make a great lap quilt as well! I’m going to pin it and try it sometime!
Alexandra says
This is just lovely. I’ve made a few basic square baby quilts before, but I have always used batting. I never thought about not using batting so I’m looking forward to trying this. I’ve never used charm packs either so I’ll look into that 🙂 I’m thinking of adding a button where they ties are. I’m thinking it will look cute. I cannot wait to try this. My little girl is 3 and a half, so maybe getting a bit big for blankies now. Perhaps it can be the car blankie 🙂 Thank you so much for sharing this wonderful tutorial 🙂 Xxxxxx
Shirley Polmateer says
Simple tutorial and easy for even beginners to follow.
Have a nice day/night.
Shirley
Renna says
I’m thrilled to have discovered your pattern tutorial (and website!) on Pinterest. I’ve been wanting to learn to quilt, but am not quite ready to dive in to the full process. Plus, I’ve been in need of a lot of baby gifts lately. I knit, but am not fast. I can see a project like this baby quilt being super fast! I never even considered that I wouldn’t necessarily have to include batting. It makes sense, though, that a thinner quilt would make a better baby blanket for swaddling.
Oh, and I remember the well-worn quilts my grandmother (Nanny) had on her beds when I was a child; they all had the ties. I never even realized what those were for when I was a child. Thanks for sharing your tutorial/pattern! 🙂
Kathy says
I love this little blanket!
Years ago, my pastors wife showed me a gift that was given to her. It was a lap blanket with a single foot pocket on the back. It looked very similar to this baby quilt. I had feel in love with the idea. Every woman in my life (mom, mother-n-law, best friend, etc..) including myself has “thin” skin and gets cold quickly (especially extremities). My question is, if I double the charm pack and add a large foot pocket to the bottom back of the quilt do you think I would be able to come close to the lap quilt I had seen years ago? Even better question, do you or anyone know how to make the lap quilt? Like I said, looks just like the baby blanket, ties and all…It would be a great gift 🙂
Amber says
Definitely. I think it would be a good size if you did that.
Nikki says
The foot pocket is such a good idea! Thanks!
Dorothy says
Was the pocket all the way across, or sort of set at the lower middle and about 16 inches across? “Quillows’ were a big deal some years back; the quilt folds up and stuffs into the pocket. Nice for car trips, school field trips, and picnics, except you have to choose between warmth and having a pillow. 😉 Also, the re-folding can be a little tricky at times, especially if the quilt batt is lofty. My kids and I made a few of these at a beach cabin, on a rainy day. We didn’t have cable TV, or computer, so their attention span was better than usual. At least they can sew a straight line on a machine. We gave these as wedding gifts. It is not compulsory to stick to gift registries, although sometimes I do.
Gerri says
I love “tie” quilts. They are so easy and fun! I like to do them but have always felt that people will think they are not “real” quilting. I wish there were more ideas and patterns for them. Thanks for posting this one. I like it!
Jill @ Create.Craft.Love. says
Great tutorial! And as usual, an adorable project!!
Shannon says
When you press, do you press it down the center to open the seam or press to one side? If to one side should it go to same side every time or alternate? Thanks. Clearly I’m a beginner 🙂
Amber says
Press it to the side and yes, quilters will tell you to alternate.
Shannon says
Thank you!
Michele says
Minky fabric? Is it thicker than flannel but thinner than fleese? Just curious as I am a beginner but started making children’s quilts a few weeks ago for our local “Linus” club. I have so far made four but always used batting. I am thinking that maybe over kill most of the year here in AZ. Thanks for your help and I love all your projects. keep up the ood work 🙂
Michelle Ledesma says
I haven’t worked with a charm pack before, and would love to. This project is perfect for my daughter’s boyfriend’s son. I haven’t made him anything yet, but I’d like to. This just might fit the bill. And I have a good friend who is expecting her first grandchild, which is a boy. Great idea for a little gift to give her. Thanks for the tutorial.
Lindsey says
I recently blogged about a charm pack quilt that I made too…love charm packs for a beginner quilt project!!!
Wanda says
Amber thank you so much for the easy-to-follow pictures and instructions. I’m hopeful I’ll start and complete the burp cloths this weekend and then move to this sweet baby blanket. Thank for choosing projects that are not overwhelming for beginners like myself. I am not familiar with the minky dots ..is that what they are called at JoAnn’s or could you recommend a fabric substitute to look for. Thank you.
Amber says
I think that’s what they are called. They are very soft and have raised little dots on them. If you ask for minky fabric or minky dots they should know what you mean.
Karla F. says
at Jo-Ann its called soft and comfy
RobinfromCA says
Soft and comfy is Jo-Ann’s brand but not the Minky brand. It’s very soft but it does shed a lot more.
melanie says
i noticed you put embroidery thread in the last step, I am wondering if this is for looks or is it meant to hold things in place? I have never done quilting but wanted to attempt this project.
Thanks,
Amber says
Yes, the knots hold the back fabric to the front fabric.
Bethany says
Hi Amber — very cute blanket! Is there any way to skip this step or alter it so that you don’t have the strings showing? Is there another way of tying it off? Thanks for the tutorial — I love it!
Amber says
You can actually quilt it if you want. The tying is just easier.
Melody says
Or you could sew cute little buttons thru all 3 layers at random places. to hold it together
Dorothy says
a bit late to add this, but it is also possible to put safety pins where corners of blocks meet on the front, flip the quilt, and do the tying on the back side. Barely visible. Sometimes instead of corners, I’ve picked a place where a tie wouldn’t show much, for example the mane of a lion or fur of a kitten, center of a flower, whatever, then pinned and placed ties there with thread that blends well. Back or front; depends on the pattern. Crochet cotton thread also works quite nicely. My fave is the baby pastel variegated. Quilting safety pins are worth the investment; the little bend makes them easier to use. Polarfleece is another awesome quilt ‘back and middle in one’, as is good quality pre-quilted solids or small prints. (The kind of fabric that makes up Vera purses, potholders, placemats). Cuddly and money-saving, both. Years back, I bought a ‘scrappy’ string pieces quilt; sewn diagonally. The blocks form a ‘diamond’ of sorts when joined. The person who made it used pre-quilted fabric for the backside (seamed, because it was not a baby quilt) and ‘hid’ the ties by making them on the back side. It may also have some sort of ‘stabilizing’ in the seams, like light-weight interfacing or flannel. I am not willing to cut into it to see. 😉 Eons ago, I used a sort of bar tack vs. ties on a quilt for my own home; that’s like a wide buttonhole stitch, done way short. Loose long threads are a hazard to little baby fingers, and buttons have to be sewn on tight. Never Fear; you have to be nearly 60 or more to know all the goofy little tricks and timesavers! Don’t be in any hurry for that. 😉
Gail says
The ends of the ties can be threaded onto a needle and sewn back inside the quilt ‘sandwich’, they barely show.
Susan Low says
I noticed that you did not mentioned batting for the middle part of the quilt. Doesn’t quilts use battting? Susan
Amber says
I don’t use batting on this-just the minky which is pretty thick. This way the blanket can easily wrap around the baby. You could add batting if you wanted though.
Lalitha says
I just love,love this baby quilt. I have always been intimidated when it comes to quilting, but this tutorial made it look easy. Thank you for a chance at this giveaway. I would love to win this for my future grandchild, hopefully in the making….
Amber says
I hope you win! The charm packs are less than $10 which is a great deal too so if you don’t win you can still get one! 🙂