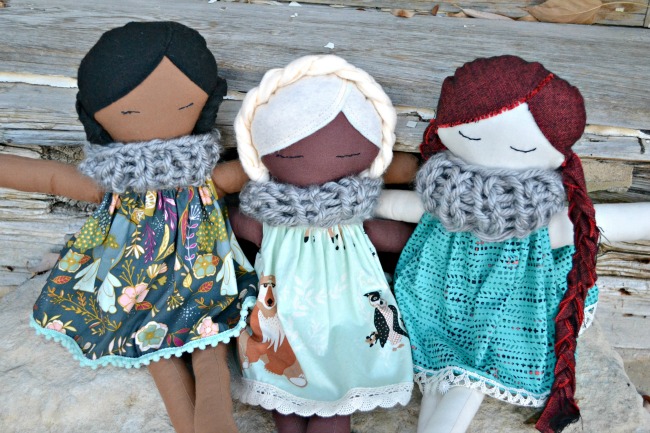
Hey guys! We’ve got another great sewing contributor debuting on Crazy Little Projects today. It’s Karly from Paisley Roots sharing a doll pattern for you to sew! This project could be a great gift, whether for the holidays or for anytime, because you can personalize and customize and make it perfect for your recipient. Change the skin, the hair, the clothes, to whatever works for you! Bet you’ve got some kiddos who will LOVE this doll pattern and tutorial!
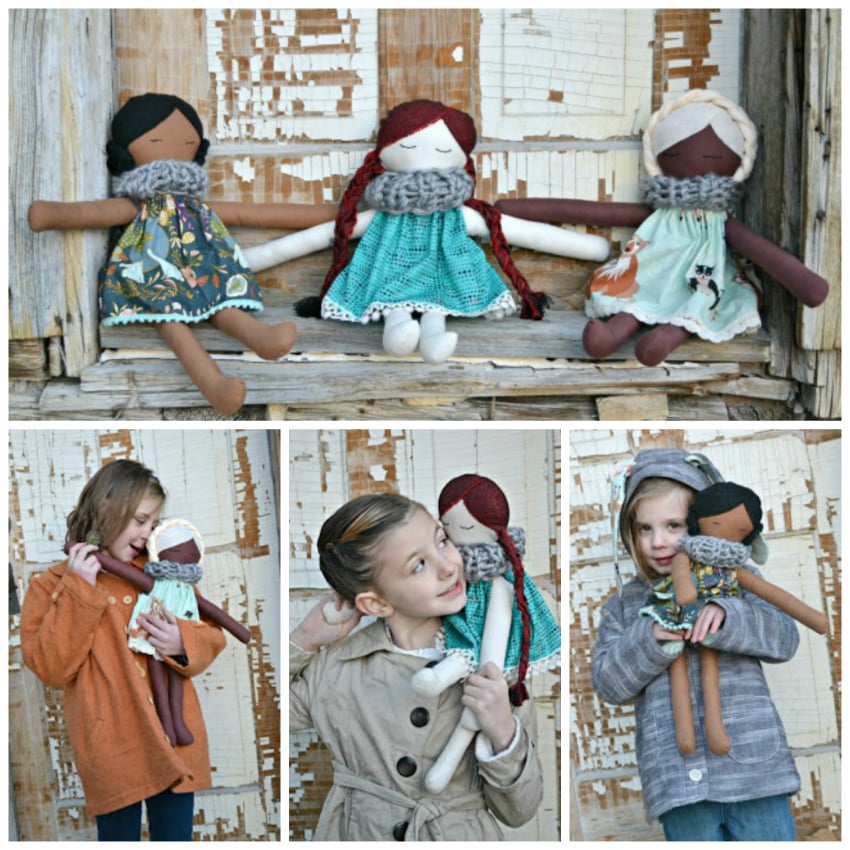
One of the best things about this pattern is that it’s great for scrap busting.
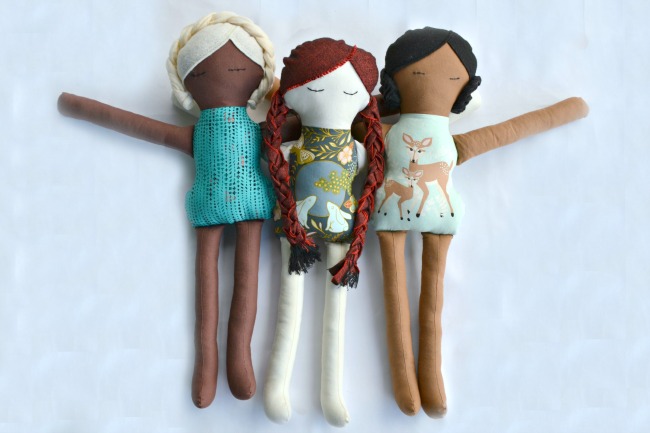
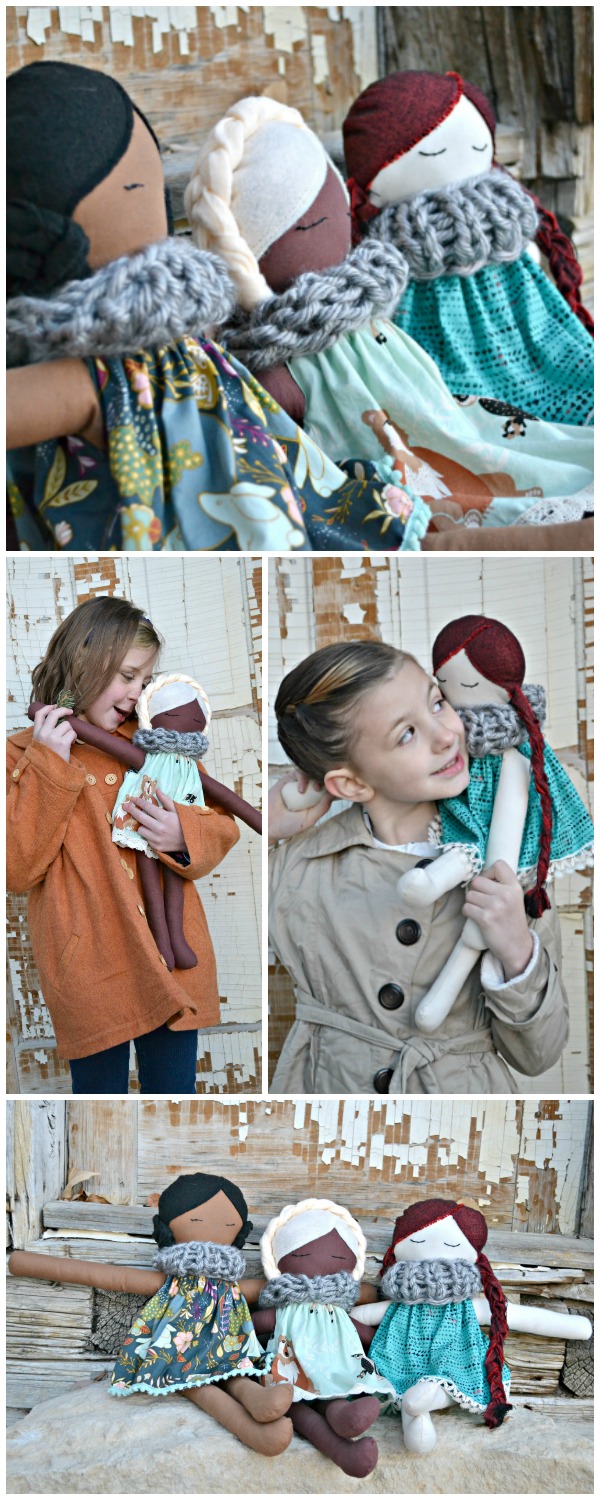
The doll measures 19.5″ tall, which is just perfect for kiddo’s to snuggle up with!

You can get the Pepper Doll Pattern here.
Once you have that downloaded and printed, we can now get on with the instructions!
Pepper Doll Pattern:
Supplies Needed:
- Fat Quarter Cotton Print
- Fat Quarter Cotton Solid
- 1/4 yard Felt or Flannel
- Matching Thread
- Poly-fil
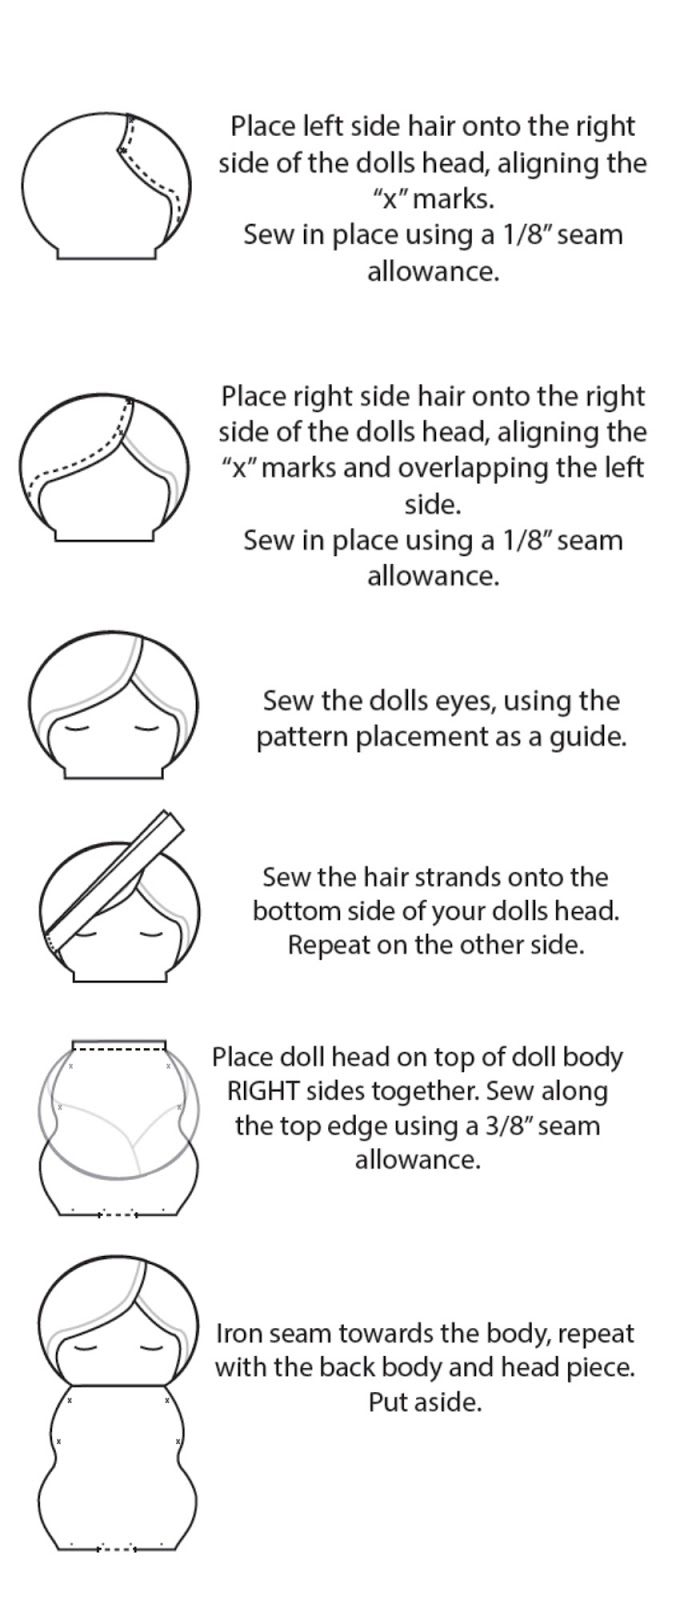
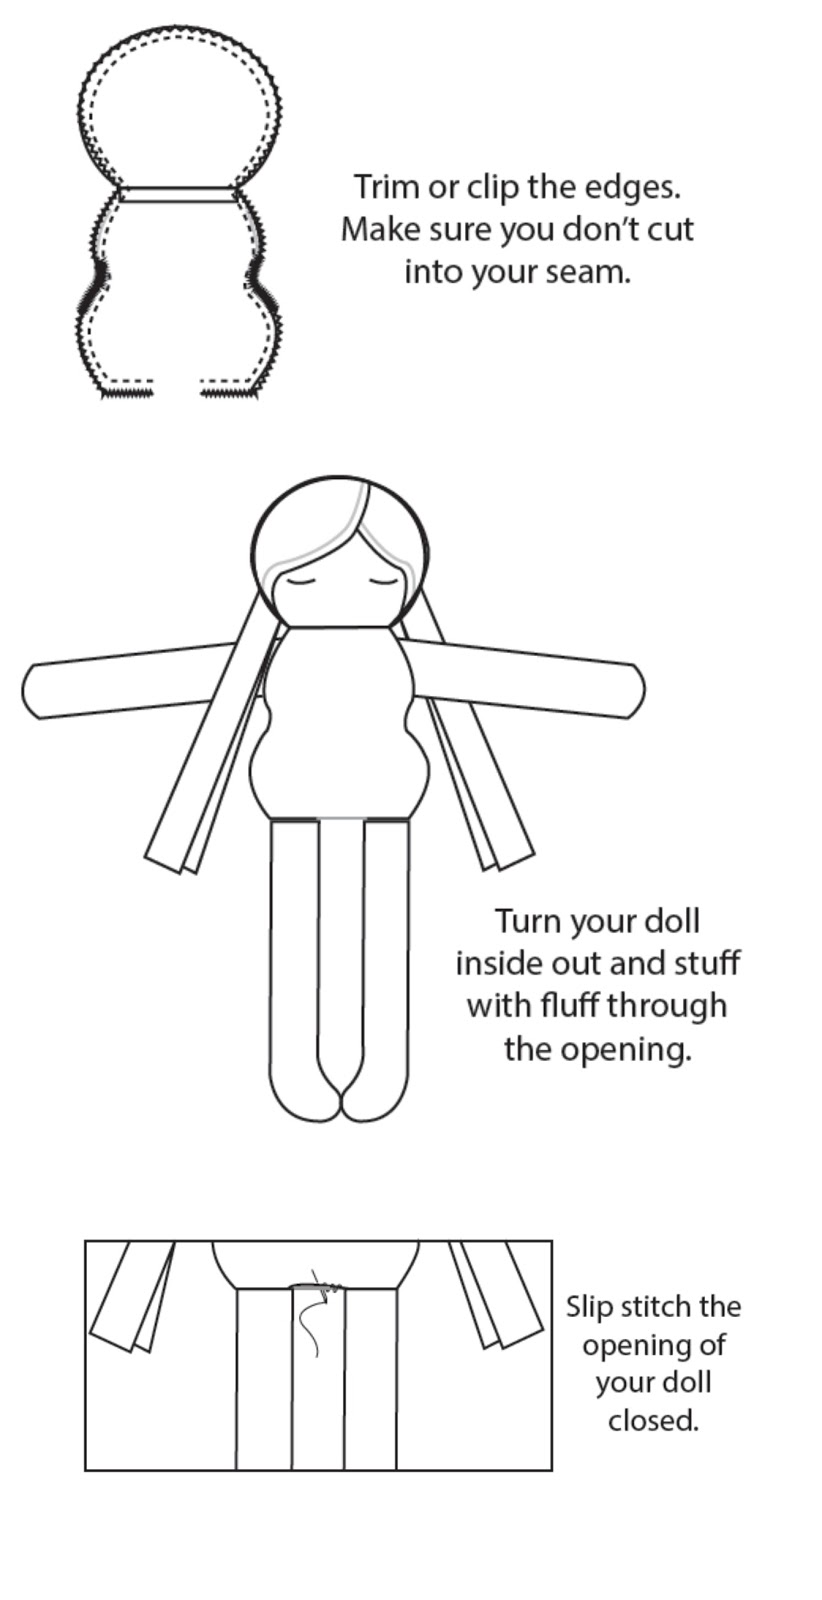
Instructions:
Cut out all of your pieces from the pattern. Then proceed with the following instructions:

Now let’s dress your doll!
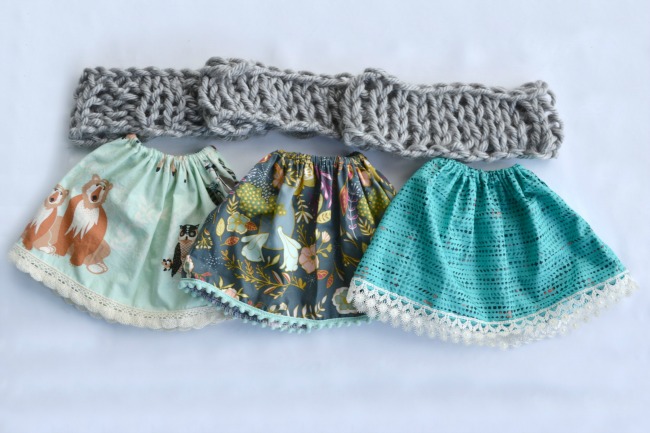
Pepper Doll Dress
- 1 Fat Quarter Cotton Print Fabric
- 1/4″ elastic – 9″ length
- 28″ Decorative Trim
- Matching Thread


Pepper Scarf
(If you’re not a knitter, add your own flair to your doll with a fleece scarf or anything else you think would look cute!)
- 1 Skien 10.5oz Chunky Yarn
- Size US 36/20mm Knitting Needles
Cast on 20 stitches.
Knit 4 rows Stockinette Stitch.
Cast Off.
Sew the short edges together.
That’s it! I hope you enjoy your Pepper Doll!
You Might Also Like:


Gwen says
Hi, I love the Pepper doll but can’t seem to download the pattern. Please help. Gwen
Amber says
Did you try this link: https://drive.google.com/file/d/0B35MInrW1Ih9cVZhcl9yVEprbnM/view?usp=sharing&resourcekey=0-c-fq0Mziqw9Q3NVysN3Nwg
Melanie says
Hello! When I try to click on the pattern it says I need to request access. Is the pattern still available by any chance? Thank you!
Amber says
Try this link: https://drive.google.com/file/d/0B35MInrW1Ih9cVZhcl9yVEprbnM/view?usp=sharing&resourcekey=0-c-fq0Mziqw9Q3NVysN3Nwg
Corona says
Thanks so much for the pattern! I love it and can’t wait to sew a few to put into the hands of needy children. God bless you!
Patricia says
Hey would you have a video how to sew the dress? I am new to sewing and I am a visual person, I need to see a step by step. I would like to make them for shoeboxes.
Thank you.
Janet says
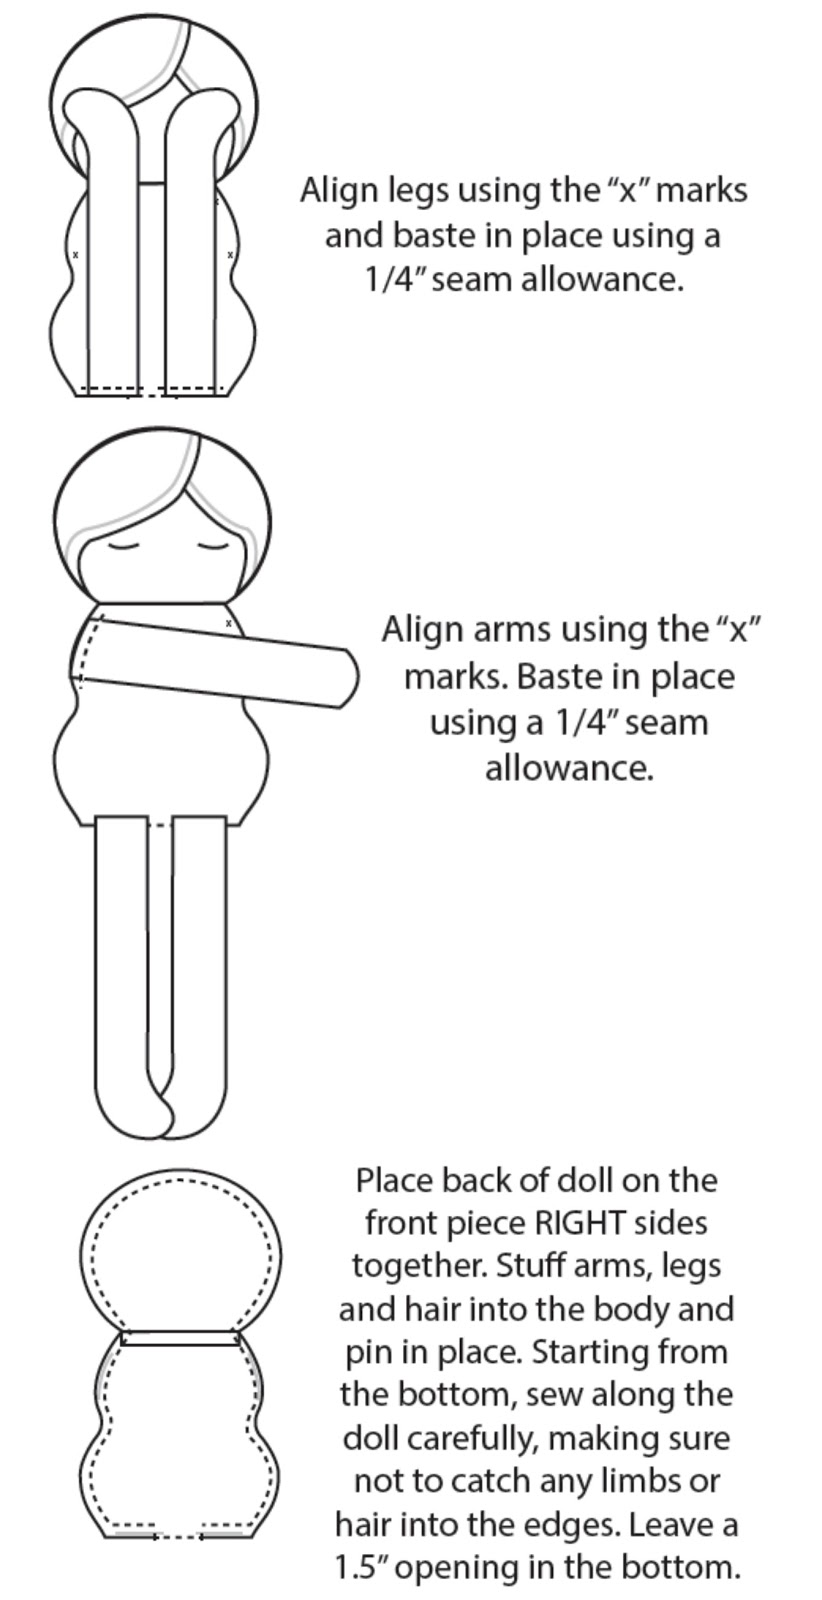
Thanks for the pattern! Love it. Now, here’s my question “How do you stuff arms and legs inside? I can’t even pin it let alone sew.”
Anna says
I just went to print the pattern, but when I opened the PDF and clicked “print” this is what I got: “The requested URL was not found on this server. That’s all we know.” I tried on two different computers and got the same thing! I wanted to use this pattern for a sewing class that I teach tomorrow! Is this an issue on my end or is there another way to print the pattern? Thank you!
Amber says
I’ve just tested it and it’s working? Try this link: https://drive.google.com/file/d/0B35MInrW1Ih9cVZhcl9yVEprbnM/view
Sharron Sires says
Thank you so much for all the free patterns!
Amber says
You are so welcome!
Carla says
Thank you for this wonderful pattern and tutorial! My daughter and her friend want to make dolls for children in the hospital, and this pattern is easy enough for them to learn. I really appreciate you putting the time and effort into this project, and still giving it to all of us free of charge!! What a kindness!!
Thank again!!
Amber says
Thank you! How wonderful that your daughter wants to sew for kids in the hospital!
April says
This is such a beautiful doll, I just made one for my niece with some clothes and had to post it to my website. Thank you so much!
Amber says
Glad you liked it!
Sharms says
Hi Amber!! Is there a special way u stuff the huge arms and legs In the doll to sew the edge… it seems they won’t fit!!! Would it be better to hand sew? Thanks for the amazing pattern and tutorial!
Kathy Cooper says
I have bought Pre-made 31″ dolls. They don’t make or sell those anymore. I also have a pattern for a clown about the size if your dolls. I bought it from one of those work at home deals. I made them, but would have been late sending them back so I gave them to the hospital for the children for Christmas.
Love this idea. I may just make the dolls for the hospital next year.
Thank you so much for the pattern.
The 31″ dolls I made as the Silent grandchildren and Mr. & Mrs Santa Claus. I crochet and nifty knitried their outfits.
Thank again for your pattern.
Gina says
I also am wondering how to get the arms and legs inside the body, mine don’t seem to fit
Yvonne says
Thanks so much, i have been scrolling for days trying to find a doll pattern with clear instructions,quick and easy to make. I am making for a friends granddaughter. I have started sewing again and i am finding it very relaxing
Bernadine says
I Have been searching for a simple doll pattern to make for my toddler grand daughter for Christmas. This is just perfect!!! Thank you!
Susan says
Thank you so much for this pattern! I made a couple last year to put into Operation Christmas Child box, and sewed another one yesterday, my youngest daughters all want one too.
Amber says
Love hearing that!
Michele Knop says
Found this today but I cannot print the pattern. I get a blank page every time I try. I want to make these for a charity and would love the pattern. Thank you.
Amber says
Are you on a device that can open PDFs? I just checked it and it seems to be working? Try this link: https://drive.google.com/file/d/0B35MInrW1Ih9cVZhcl9yVEprbnM/view
Lynn says
Hi Amber
I’d love to get this pattern but this link isn’t working. I get the site can’t be reached.
Amber says
Try this: https://drive.google.com/file/d/0B35MInrW1Ih9cVZhcl9yVEprbnM/view
I just double checked and it should be working?
Jo says
Echoing so many others here, but THANK YOU so much for your pattern! I live overseas, and I wanted to find a cute toy for my friend’s daughters birthday. Making one turned out to be the absolutely best option with the help of you pattern. I’m really excited to give this to her. Thank you so much!
Maria Eugénia says
Hello from Portugal
I just want to thank you for the pattern and instrucions of the fabric doll. So Nice!
Love from Oporto
Maria Eugénia
Ines says
Hi, These dolls are adorable but I cannot download the PDF with the pattern. Is there any issue?
it starts and then I get a message informing there’s an error.
Could you please check?
Amber says
I just checked it and it should work? Here’s the link: https://drive.google.com/file/d/0B35MInrW1Ih9cVZhcl9yVEprbnM/view
Sarah Dieleman says
Hello, I was very excited to make this for my daughter but the pattern link is no longer working. Is it possible to send the pattern to me?
Amber says
I think it is working now: https://drive.google.com/file/d/0B35MInrW1Ih9cVZhcl9yVEprbnM/view
Vandoll86@hotmail.com says
Hi there! I love these dolls! They’re so beautiful. Thank you for these tutorials. I’m a bit stuck on the arms and legs past, though. How is it possible to stuff all four long limbs inside the short body without sewing into them? Also, if we sew around the whole body except for the small opening in the bottom, aren’t the legs going to be stuck inside? I can’t picture them coming out, I figured there’d have to be at least two bottom openings for the legs…
Please if you can help clarify all of this, I’d truly apteiatr it! I’m new to this sewing, but have loved the learning process so far! Thank you again!
Nicole Harding says
I have the same question. lol
Justine says
My daughter is wanting to have the plaited hair going around the top of her head. How did you do that? Is it still the two sets of hair, or one longer set? Assume we sew it onto her head? Thx!
Justine says
Hi, are you able to help us with this? My daughter has been waiting patiently but she’s really keen to make some progress with her sewing. Thx!
Karly Nelson says
Hey Justine! Sorry I didn’t see your question before! For that one I didn’t sew the braids into the head. I made one big thick braid long enough to go from one side to the other and once the doll was all made up (bald) I hand stitched it in place to the head. It was really easy to do and holds up against washes really well!
Debbie says
Hi Karly I am new to all of this – I have been searching for a cuddle toy for my granddaughter – we miss each other dearly and I wanted to send her something filled with love, hugs and kisses for her to hug when she is sad and missing me. I found your Pepper Doll pattern and it is the one but I can’t find the tutorial – help
Karly Nelson says
Hey Debbie! The tutorial is in this post. The instructions are right under the first pic after you get the pattern. That sounds so wonderful to send to your granddaughter! I know she’ll love it!
Ellen says
I’m so confused with the dress part. Where are the arm holes? 😀
Karly says
Hey Ellen! When you sew up the side seams I have you leave a 1.75″ opening when sewing the side seams for the armholes. It’s the second step of sewing the dress. Let me know if you have more questions!
Karly
Ellen says
Thanks so much Karly. I figured it out lol I’m such a slow learner with the whole sewing thing but getting there and my little girl loves her dolly. Thanks so much for the pattern x
Emilie says
Hi, This is such a great tutorial! I just had a question regarding the pattern licence, I can’t find any details in the blog post or on Paisley Roots. Can it be used to make and sell dolls? Thanks!
Amber says
I’m going to publish this and let Karly answer this.
Karly says
Hey Emilie! You are absolutely welcome to make and sell dolls using this pattern! The pattern pieces and tutorial themselves are copyrighted, so you can’t sell the pattern, but physical dolls are absolutely encouraged and I wish you the best of luck in your business!!
Karly
Sandra says
Thank you for this doll pattern and tutorial. Please continue to post these great ideas. Any plans tor a YouTube Channel for your tutorials?
Karly says
I have plans for that someday but I still need to get all the set up! It’s something I’m learning! Thank you so much!!
Karly
RWTreasure says
I am confused on the dress pattern. If I start with an 18″ by 22″ fat quarter, do I cut that in some way for the dress?
The directions say to finish the side edges, and later the top and bottom edges. Are either of these sewing together side seam(s) to make the round (front/back) of the dress?
Clearly the conpleted dress isn’t a flat piece 18″ or 24″ long, so I missed a step or two somewhere in cutting &/or sewing?
Karly says
Hey! The pattern to the dress is in with the doll pattern that you download. You will cut two rectangles from it as directed. You will finish all the edges first because when you sew up the side seams you will be leaving an opening for the arm holes and therefore can’t serge them together afterwards. Once you sew up the side seams you will finish the top and bottom. Hopefully that helps! Let me know if you have anymore questions!
Karly
Ashley talbot says
thank you so much for the free doll pattern! I made one for each of my girls for Christmas and they love them so much.
Deanna says
What a great pattern. I have been looking for a doll pattern to make Christmas gifts for Operation Blessi ng through our local police department. Jackpot!! This is just what I need. Things are looking up for next year. Thank you so much & Happy Holidays!
Suzanne Cloutier says
Awesome! Definetly will make this doll for my granddaughter. The instructions are well written! Thank you so much for the free pattern.
sonja says
Very cute. Ragdolls are always so sweet and fun to make. Thanks for sharing.
Filo says
Thank you a lot for this lovely pattern just right for my grand daughter 3 years old.
Nola Connors says
Hi Amber, I am starting the doll for my granddaughter. Why don’t I have to cut out two heads? How will I stuff it if I only am cutting out one? Thanks for any help you can give me. Nola
Amber says
You cut one from skin color and one from hair color. Hope that helps!
Martha says
Such a cute doll. For the past 30 years in our extended family there have only been boys. We now have another set of twins in the family but this time there is one beautiful baby girl. I will be making this doll for her but also I will attempt to make a little boy doll for the other twin. Thanks so much for the pattern
Amber says
Oh fun! And my family is a lot like that. We went 34 years without a girl and then finally got one!
Laura says
Oh wow, these dolls are awesome! I love the prints you used for the bodies and dresses too. Thanks for the free pattern, they’ll make fantastic gifts.
Crystal D says
These are so cute! I’m totally making one. Thanks for the pattern!
Teronia Sherece says
These are adorable!! My stepmom gave me a doll like this that I had for about 10 years. I’m so happy to be able to make one for my own daughter or give to a special little girl. Thanks Karly!
Abbie says
This is such a cute idea! What a great way to use up scraps. I was wondering if it would be all right if I sell dolls that I make from this pattern. (I know some people have a problem with selling items made from their patterns, so I just wanted to be sure.) I love your blog! Keep up the amazing work! 🙂
Amber says
Yep-that’s fine! 🙂
Abbie says
Thank you so much!
lynn says
how?? to download & print this pattern and tutorial
Amber says
There’s a link in the tutorial to the pattern.
Melissa says
What size do you print this pattern at? A4?
Amber says
Letter or A4