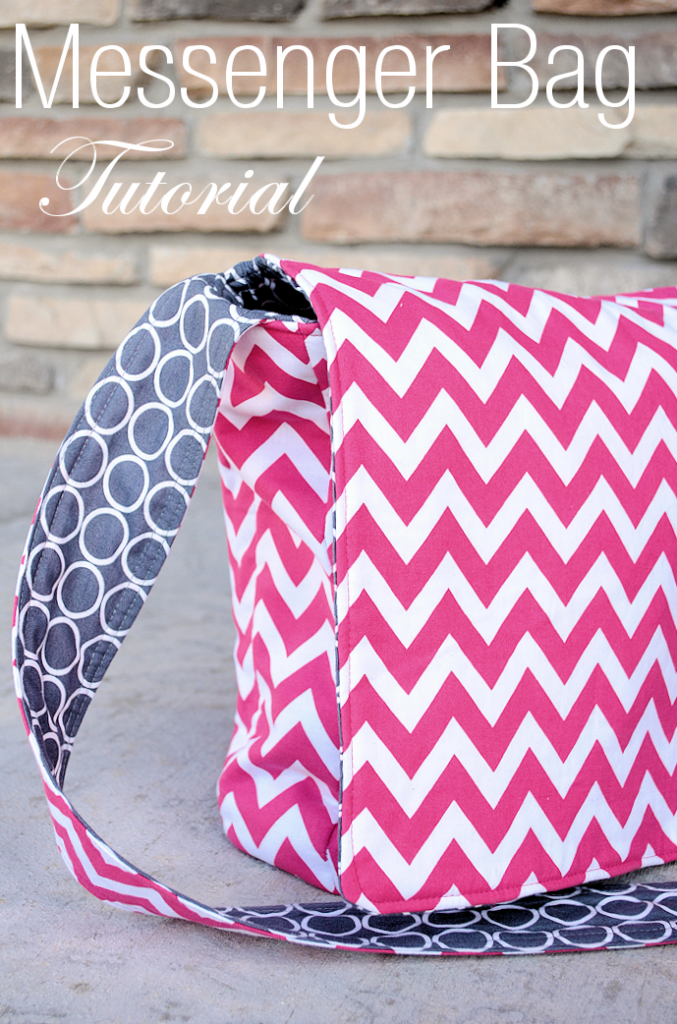
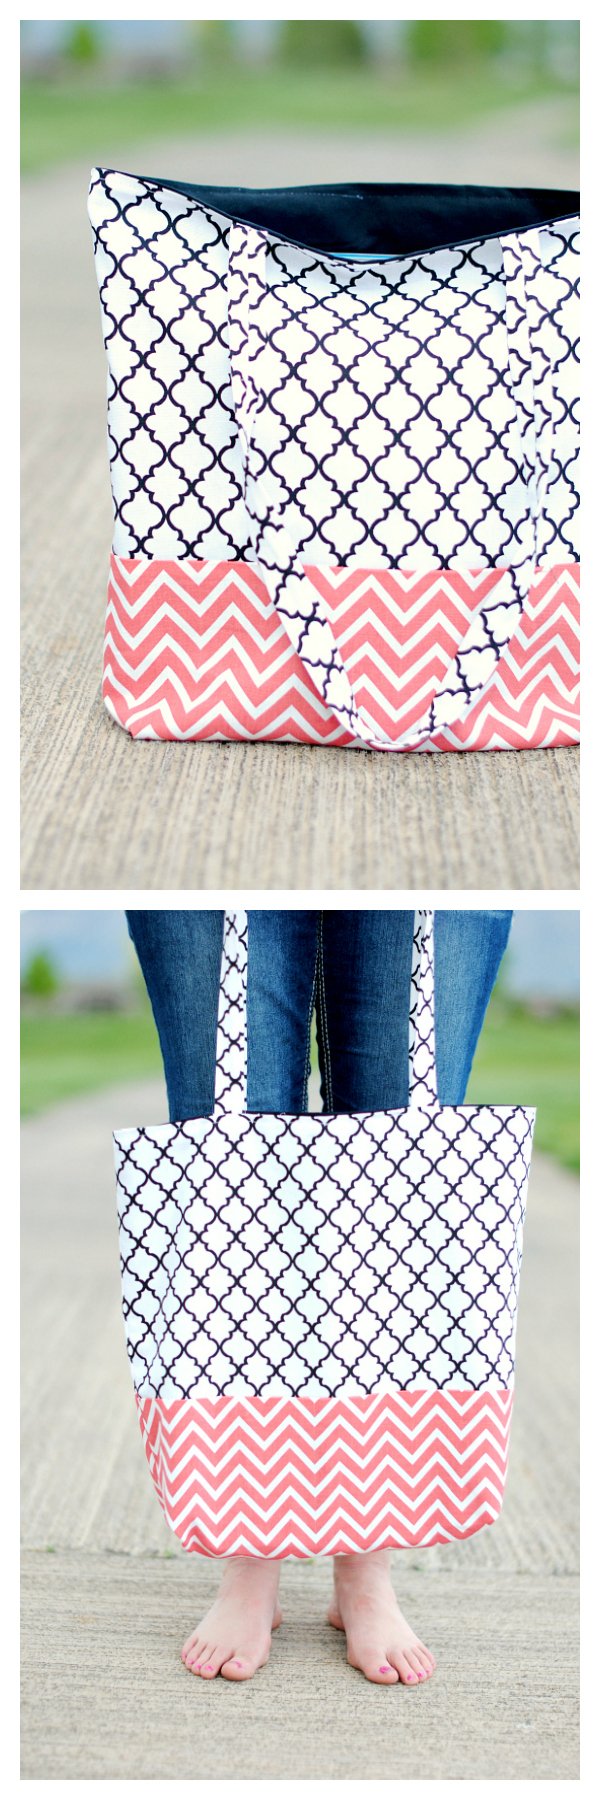
What’s the Project: This easy tote bag pattern with tutorial is fast and turns out great-a perfect sewing project for beginners. Very easy instructions to follow and you will love how this cute bag turns out.
Every woman loves a good bag-am I right? They can be filled with diapers and toys when you’re in mom mode, they can be cute and flirty when you’ve got a date, or they can be filled with your laptop and notebooks when you head to work or school.
Or sometimes in my case, they can be a bottomless pit filled with who knows what-how’d that french fry get there?
I’ve got a few different large tote bags that I use for all different things and it’s handy to have a bunch around so I don’t always have to switch out the things I need in it for that day.
Bags are one of my very favorite things to sew and the beauty of this lined tote bag pattern is that it’s super simple. It’s all straight stitch lines-a perfect easy sewing project for beginners. And it’s super cute! You will love this eas tote bag pattern.

If you don’t know how to sew a bag, this is a good place to start! This tote bag pattern is easy and you’ll love how it turns out! It’s great for all ages and you can make it work for anything-a library bag, a purse, take it to the pool, to church, whatever you want!
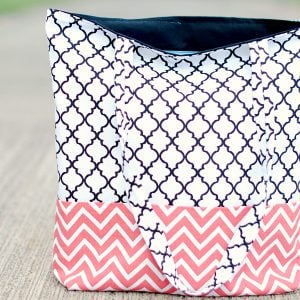
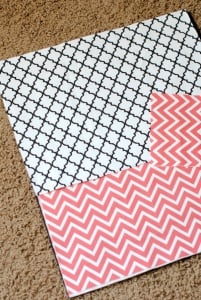
It’s got one fabric on the top, another on the bottom and I did a third inside. So you can customize it for the person you are making it for! Or make several for yourself and they could all look different from each other.

And now I’ve got an updated version too that has a pocket on the outside if you prefer that. Check that tote bag tutorial out here.
So let’s make this great DIY tote bag! I think you’re really going to like it.
How to Make a Tote Bag:
I’m going to give you all of the instructions you need to make this down below, but here’s a video tutorial for this pattern as well if you prefer that. (The supply list is in the written instructions below so be sure to check that out before you watch the video.)
Video Instructions:
Or here are the step-by-step instructions which you can print and use or just read from your computer, phone, or iPad.
Simple Tote Bag Sewing Instructions:
Supplies
- 1/3 yard canvas or duck fabric for the bottom of the bag
- 1/2 yard canvas or duck fabric for the top of the bag (you will need a bit less than this)
- 1/2 yard canvas or duck fabric for inside of the bag (this could be just a basic cotton instead if you prefer)
- 1/4 yard fusible fleece optional: to line the straps and add durability to them
- sewing scissors
- sewing machine
- threads to match your fabric
Instructions
- Step One is to Cut Your Fabric. Here’s what you need to cut. You can use a rotary cutter to cut super straight lines (or wing it with sewing scissors if you prefer.)From your bottom fabric cut 2 pieces that are 17 inches wide by 8 inches longFrom your top fabric cut 2 pieces that are 17 inches wide by 12 inches long (Note: Wait to cut your inner lining fabric) For your straps or handles (from whichever fabric you prefer), cut 2 pieces that are 31 inches by 4 inches (Optional-if you feel like you want to straps sturdy, line them with a fusible interfacing like fusible fleece)

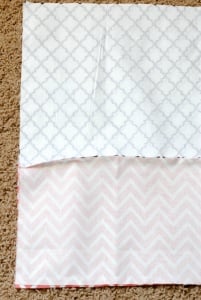
- **Use about a 1/2 inch seam allowance for this. It's a bag though, so it's forgiving if you use a different one. Prepare the outer fabric pieces and sew the outside of the bag togetherPlace top fabric on the bottom fabric with right sides together across the 17-inch width and sew them together. Do this for both of your outside pieces and then iron the seams flat.
- Now it’s time to cut your inner pieces.With one of your pieces that you just sewed, place it on your inner fabric and use it as a guide to cut out the inner fabric to match what you just created. Cut 2 of your inner fabric using that template.
- Sew around the outsidePlace right sides together for your inner fabric (what you just cut) and sew the two inner pieces together around both sides and the bottom, leaving the top open. (About a 1/2 inch seam is perfect here.)Next, do the same with your outer pieces. Sew both of your outer pieces together around both sides and the bottom with right sides facing together.
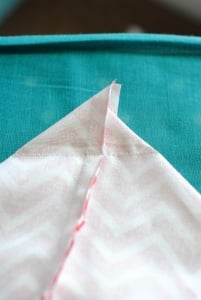
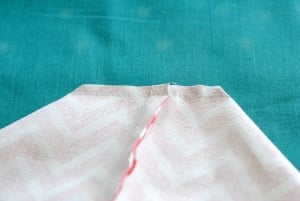
- Creating box cornersNow you are going to create box corners on these along the bottom seams. Do this with both outer corners and both inner corners. To do this, grab the bottom corner of the bag and turn it so that that the fabric is laying like this:

- You will then sew a seam across the top tip of that triangle a few inches down from the tip:
- Then snip off that tip:
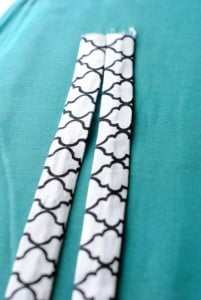
- Sewing the strapsTake your long pieces and fold them in half the long way with right sides together and sew up the long side. Turn right side out (this will be a little tricky and time-consuming. I use a chopstick or pair of scissors to help push the fabric though. And I watch a good show while I do it.) Press straps flat with seam in the center of the back:
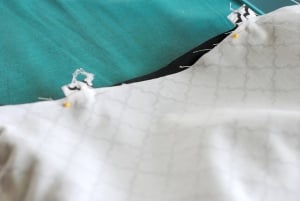
- Assemble the bagNow, turn your inner fabric right side out but leave your outer fabric inside out. Put the inner bag down inside the outer bag. Slide your straps inside the bag in between the two fabrics, making sure that the seam on the back of the fabric is facing the inside of the bag and pin everything in place like this so that the fabric is even all the way around and the strap ends are between your inner and outer layers of fabric on both sides and have the ends poking out slightly.

Hope you’ve loved sewing this easy tote bag pattern!
You Might Also Like:
Pin It:


Mara Duba says
i am going fabric shopping, what is duck fabric?
love these totes! i can’t wait to make one!
Amber says
It’s like canvas. Sometimes it’s called duck.
Mia says
Hi, the video isn’t linked here anymore. can you share it?
Amber says
I just double-checked and it’s working on my end. It’s right above the instructions. Can you see it there?
Lisa says
Thank you so much, I’m new to sewing and I’ve just completed this bag – delighted with how it turned out!
Amber says
I’m so glad!!
Ruth Laracuente says
Omg I just made two of them I’m obsessed on how cute they came out thanks for the video and patterns
Amber says
I’m so glad!!!!
Christine Schofield says
Love the look of this! Going to buy some material to try it. But I think I’m blind, because I don’t see a video on here.
Amber says
It’s the first thing that should come up under instructions.
Christine says
Thanks. It actually doesn’t show up in the browser I was using (brave) but I opened it in chrome and its there! Thanks
Violet says
Hi Amber! I love easy and fun sewing projects like this! I’ve got a round-up post scheduled for today that links to your tutorial.
Thank you!
Mia says
love the bag but uses a lot of material
Julia P says
The instructions for turning the straps inside out say to push the inner part through with a chopstick, but I found it way easier to get it started then just stick a finger in the folded end and pull it through. It only took a minute or two!
Amber says
O good!
Sharron Johnson says
Love this very versatile, yet simple pattern. Only thing for me with the handles, I like to do a little straight of decorative stitching to strengthen and stabilize them. Contrasting thread on the handles to give them a little pop as well. Thank you for sharing this pattern.
Kelsey says
Hi! I’m a beginner sewer and bought the material to make this bag but then realized (after reading about canvas fabric) I may not have the correct needle and thread size to make this bag. Could you tell me what size your needle and thread were? Also the type of thread? Thank you!
Amber says
You should be fine with normal needle and thread for this.
Tracy from Australia says
Yeah I did it lol although it’s a lot sturdier fabric canvas which I’d never worked with. I used calico for the lining and I didn’t have enough fabric so reduced handles to about 22 inches. However sadly for a short person like me it just touched the floor unless it’s over the shoulder. Might make the next one a couple of inches shorter. Thanks very much.
Jo says
How much seam allowance did you use?
Amber says
1/2″
Mallory McKinley says
I didn’t see it so maybe I’m blind bit what ate the final dimensions of the bag? I’m wanting to make a diaper bag but I’ll add a recessed zipper to it.
Amber says
I used 1/2 inch seams so just subtract about 1 inch from each of the cutting dimensions to get the finished ones.
Ann says
how far in do you place t he handles and do you add fusible interfacing to inside of fabrics and if so, do you add it before you sew the pieces together of after
Amber says
Add the fusible fleece before you sew. The handles should be a couple of inches from the sides.
Deby Villalobos says
I made this beautiful bag last night! Loved it. Thank you!
Amber says
Awesome!
Nyasha Mbada says
Thank you for the tutorial, am so excited to try new things
Amber says
Enjoy! Thanks!
Feyza says
Is it possible to make this without using a sewing machine? I’m looking for an arts and crafts project for my high school youth group, but we wouldn’t have access to a sewing machine.
Amber says
It would be pretty hard! It’s a lot of sewing!
Elena says
The first time I made this bag I did it all by hand without a sewing machine! The only thing I did differently was use ladder stitch to finish the opening where I’d turned it inside out instead of topstitching all the way around. The finished product looks fantastic and all the stitches are totally invisible! It is time consuming though so for students there would be a lot of homework involved. I also didn’t reinforce the straps; hand sewing straps into the bag with extra bulk might be a challenge.
But it’s totally doable!
B says
Is there video available? It would be easier to follow, cause im total beginner and not native english speaker. But i like your project! 🙂
Amber says
Yes, there’s a video in this post. 🙂
Daniela says
Hi, I’m a beginner and was wondering if you still have a link to the video? It seems it’s no longer linked in the text above. Thanks!
Amber says
There’s a video right in this post now.
Alexandra Stevens says
Thank you for getting me excited about using my sewing machine! I will try to make this tote! Will get material and thanks to you, start a wonderful hobby making holiday gift totes for family and friends! 👍
Amber says
That makes me so happy!
Jill says
Thanks for this free pattern! I’m going to be using it to teach my beginning students how to sew in straight lines and follow simple instructions. I will of course credit you 🙂
Amber says
Wonderful! Thanks!
Annie Mac says
Hi. I made my version today. It looks lovely. Many thanks. Annie
Amber says
Glad you enjoyed the pattern!
Tracey Mack says
Thanks for the video. Going back in for second attempt with the straps so they are in the right place when I turn it. Just not feeling the process right now.
Yasmin says
To make it easier for some commenters, I’ve made this bag twice now and it is really simple, you put one strap on one side and the other strap on the other side. If you find it confusing, go up to the top and look at the picture of the completed bag, it helps so much. Make sure the seam on the strap is facing the inner fabric, then sew around the whole bag leaving a gap to turn it right side out, when you top stitch it closes the gap. It’s easy to make it smaller, just cut your fabric smaller which is what I done with the second one and I made the straps thinner and shorter too (I’m only 5 feet tall so it’s easier for me to have it shorter). Thank you for this pattern! I’ve only been sewing for around 3 months (complete beginner, never having seen anything before that) and it is perfect for what I need.
Ps. All of my work colleagues thought I had bought my bag, not made it lol, can’t wait to start using the second one which I’ve literally just finished 🙂
Karin M Nystrom says
Hi, two points.
1.) I understand the confusion on the straps. Could you address that issue, please? A lot of us are having problems with the instructions. Thank you.
2.) In the photo, the tote looks lined; is it?
Amber says
Have you watched the video of the process? I use fusible fleece on the inside of the main fabric to add some bulk.
Kimber says
I’m working on this bag at the moment. It has been so easy and my finished project is looking soooo cute. It is for my girlfriend so I am excited. I am to the part about sewing it all together. Very clear about how to position everything but I’m confused. Those straps are only on one side of the bag, right? and, wont that make the bag sort of gap when it is held by the straps? always hang open? Im confused about the positioning of the straps. help please. Otherwise I will just whip up another strap and put it on both sides before it sew the whole thing together.
Thank you for this,
Have had a very enjoyable day constructing.
Amber says
There’s a strap on each side of the bag. 🙂
Petra says
Thank you so much Amber! It looks so easy. M going to try make one. Was thinking I might need pockets inside. Any guidelines on sewing pockets too!
Thanks for sharing!
Petra
Rosie says
Just made the bag, took less than an hour and I love it. If I knew how to send a picture I would! Thanks so much! Rosie
Amber says
Oh glad it went so well!
Laura Harrison says
Hi – love this bag! Does it definitely need to be Cotton Canvas that you use? I have lots of just normal cotton – is it too thin?
Amber says
You can totally do anything-I just liked the canvas to add a little bulk.
Masoom says
Thanks for your tutorial. It helped me to make a wonderful tote bag. I am making one bag for my son, as he is going abroad and one for myself. The tutorial was very easy to understand. Thanks once again.
Amber says
Oh good! Glad it went well!
diane says
great tutorial. I made this bag today, added a side pocket for an umbrella, straps 28 inches with 1.5″ sewn above the seam, and then did an x on the top side to secure. lovely
Elizabeth says
I just made 2 of these! 1 for practice and 1 as a teacher gift!! I’d love to tag you on fb when i post a picture! This was a great tutorial. Thank you so much!
Amber says
Yes! I’d love to see it!
Jenny B says
Just finished making 4 of these super cute bags!! I added a pocket to the inside from the scraps and made the inside the same as the bottom of the bag.
Amber says
Nice!
Craftgossip says
Love this easy tote, thank you for sharing
Jenny says
HI, I’m sorry but I just didn’t get the part after making the straps about how to sew it. Can you please further elaborate it?
Angela Starns says
I made the bag & love it! When I make it again I will attach the straps differently. I will have the raw edge of the strap extend above the top of the bag by 1.5 inches and baste in place before joining the lining with the outside of bag. After turning the bag I will top stitch an inch below the top around the entire bag to secure the straps. I might stitch an X over each strap also to reinforce those straps even more.
Stefanie says
I just saw this design haven’t tried it yet…but I hope it works out cause I’m really new to this
Rita says
Exactly how far down do you sew to make your corners—the ones you clip off- I don’t want to cut it too far down—please Help
Nabeela says
Hi..
I am going to try making this soon.
I want to know if its okay to use a fusible interfacing for the outer (2] fabrics to make it sturdier?
Thanks a lot
Nabeela
Amber says
Totally!
laya gaga says
Wow!! Wonderful tutorial. Brilliant work. I Love it.
Holly says
Great tutorial, thank you so much for sharing it! This is very similar to the library book bags I make for mumsy-in-law (who is a book-borrowing fiend) except the measurements are much better than mine. So I’ll be your measurements from now on. I also do a fabric collage or art of some type on mine. Last time was a photo of her when she was four, jumping into the air. I added fairy wings, flower headband, and a tulle skirt. I collage’d the words “Yippee, time for books!” on it.
gramma babushka says
yes finally the perfect bag ! i have searched for years but could never find one ! alas my search is over ! i can now die in peace , knowing that i can pass this on to my grand daughters they are very nice kids you should love them too !!!!!!!!!!!!!!!!!
Emma says
I love this. I love the prints too. Can anyone tell me where I might be able to get those patterned fabrics? I know it’s a long shot…but I just love the combination of those patterns!
Amber says
These were from Hobby Lobby.
Anne Raymond says
Thanks for the pattern and such clear instructions. I want to make Halloween totes for my Great Nieces.
This will be perfect. I can easily resize it to fit them, And I can get cute Halloween fabric for the bottom half and something solid for the top half that I can personalize with Heat Transfer Vinyl.
Amber says
Oh my word! What a cute idea!
Berkeley says
Is there a way to make a smaller version of this same tote bag?
Amber says
Totally, you would just want to size it down proportionally.
Danielle Snow says
What is the seam allowance you used?
Berkeley says
1/2 inch.
Melissa Newell says
This was my very first sewing project, and I’m so excited about how it came out! I learned a lot during the process, and I’ll probably go back and look at your “learning to sew” series before trying another like this again. But it did come out really well, and I’m very happy! Thanks so much for the tutorial!
Amber says
Love to hear that!
Natalia Hernández says
Thank you so much for this great tutorial! I just made the bag!! thank you!!!
marian hone says
Hi! Thanks for the tutorial! I hope it is okay I shared your blog link on my page! My Mini version of the Tote is going to make an awesome present for my 2 year old! http://www.facebook.com/spunhoneyfabrics
Valerie says
Thank you for sharing. I have made lots of them. I’m addicted and giving away as Christmas gifts.
Sadie says
If I wanted to add a zipper to the top of the bag what size zipper would I need?
Amber says
I don’t know for sure!
Lauren says
This is a great tutorial! I have never made a bag before and a smashed it in less than four hours. I used some leftover denim and some funky leftover curtain fabric for outside with a cheap thin cotton to line the inside, also leftovers and it looks really great, I just love it. I might add a press stud or two to help close the top when in use.
Amber says
Nice!
Sueray says
Very nice bag Amber.. and thank you for sharing it with us. I definitely gonna try this for my next project..
Alison says
can’t wait to try this! would it be ok if I added medium weight iron on pellon to the outside fabrics before assembling?
Amber says
Definitely!
Amanda says
This design is very cute but I got lost on a few of the directions. Pictures for each step would’ve helped. Thanks for sharing!
Caroline says
Hi! Thanks for the tutorial, this is such a cute tote! I’m planning to make some for teacher gifts and fill’em up with goodies 🙂 what seam allowance did you use? Thanks!
Amber says
This bag is very forgiving so it won’t really matter, but I used 1/2 inch.
bridget says
What is the finished dimensions of the tote bag?
Amber says
Should be about 15 by 10 or so.
Tracey says
Great fast tote bag! I just made it & love it! I added a zippered pocket to the inside lining to hold keys/cash/etc. It’s easy to add the pocket before sewing the lining together. Great quick project for summer. Thanks.
Amber says
Nice!
Breanna says
Sorry if I missed the direction, but how do you use the fusible fleece?
I’m very new 🙂
Amber says
Fuse it to the underside of your fabric and then just sew like normal. Just adds some bulk.
BirdieP says
This bag turned out great! I added my daughter initial so she can take it to nursery. Thanks!
JJcuties says
Cute tote bag. I’m going to try to make it. Thank you for sharing.
Laurie says
Great tutorial! Mine turned out very nice. Next time I will use interfacing and add a pocket to the indide.Thanks for sharing!
suki says
very cute. I like your tutorial. 🙂
Sherry Fish says
Love your work!
Trish says
I love these little tote bags. I’ve been making them out of scraps of left over material.
These are then sent to the shoe box appeal for underprivileged children who have nothing and don’t even get Christmas presents , a worthy cause. The brighter the colours the better and it gets rid of scraps too.
Amber says
Perfect!
Lyn says
I love what you do with this bag when finished. So many times I don’t make things anymore because I don’t know what to do with them. Great idea. Thank you
Lauren says
Reusable grocery bag
Library bag
Beach bag
Overnight tote
Zuhuda Shahul says
I love this bag very much. I think I can use this as basic bag making and it is very easier than I thought. A big thank you for sharing……..
Ruth says
Cute bag. I made this today but didn’t feel the directions about finishing – putting the straps on was very clear. I had to repin it three times before I had it right. It states to turn the inside right side out but then does not tell you how to put them together to sew them. The picture was not clear to me either. I do love the bag and the overall ease of making it. Thanks
Sharon says
Agree. I have to redo my straps. Another picture or two on this step woujd have been great. The rest of the instruction was easy to follow. But make sure your box corners are even on both sides. Do one and hold it up to the opposite side to measure, so they match. Thanks for the instructions.
DervalMay says
Agree! I had the same problem. It was the only step of the process I felt wasn’t well explained or illustrated and it’s one of the trickiest! I also was unsure about the flipping right side out and then tucking the inside in etc…
Tana says
I love this basic bag! Easy and it can be dressed up as much as you wants!
Marita Boutens says
That is a very nice bag. I love to make bags. All kind of bags and I will make this one too. For myself or to give away. Glad my son has a girlfriend who loves bags too, so another reason for me to make them.
Thank you for this pattern and tutorial.
Greetings from Holland
Carla says
Love the bag. Is it easy enough for a beginner? Love the fabric, where is that from??
Thanks for sharing…….
Amber says
Yes, it’s a pretty good beginner project. The fabric is from Hobby Lobby.
Kirthi says
Hi, may I know the fabric type. I am a beginner. Is it normal cotton fabric or something….?????
Amber says
Yes or a heavy canvas is nice for it.
Mandy says
Can you easily sew the canvas and like a quilting cotton together? Also, I’d like to make my tote with canvas only on the bottom, but put a pocket inside, how can I do this?
Stacey says
Oh, that is very cute. I love the shape of it and the mix of fabrics. It is very similar to one I just recently made, except mine had grommets that the straps went through. I love seeing how it would look with regular straps! I will definitely make this one! Thanks for another great project!!