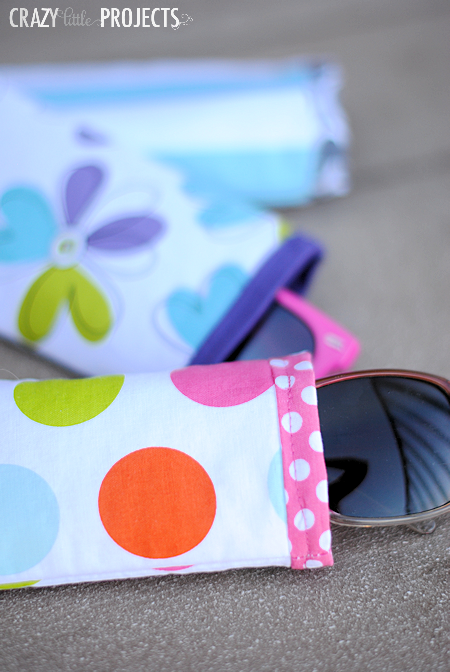
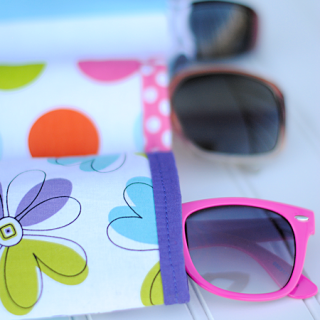
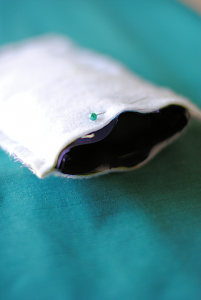
What’s the Project? This summer sew up a cute little DIY sunglasses case in 3 easy steps. It’s great to throw in your purse or beach bag and take on the go with you.
I am notorious for losing my sunglasses.
In fact, my brother bought me a bunch of $5 pairs last year for my birthday so that I would always have a backup!
And then you know what happened? I managed to hang on to my favorite pair for almost a year! Well, now my favorite pair got all scratched up. Not sure if it was from being in my bag or from the 2-year-old, but either way, it’s sad right?
So, I put together a cute little DIY sunglasses case pattern and I am giving it to you today!
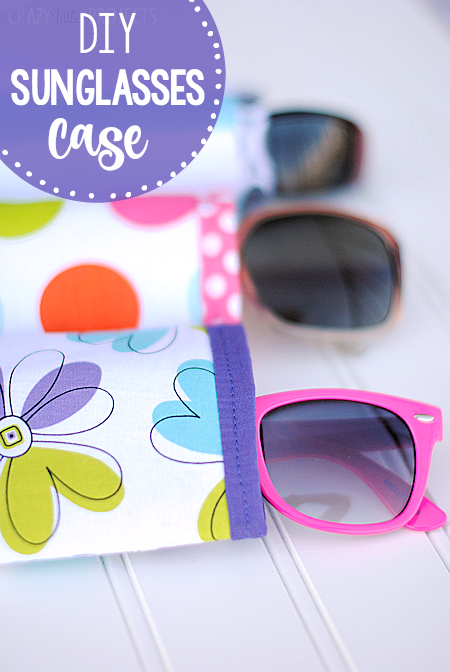
Seriously, these are easy. They should take you about 10 minutes (heck, even if you’re a newbie, it should take not too long!) and uses only a few steps and all straight lines.
I made several because they were so much fun!
Let’s learn and let’s make some shall we?!
Easy Sunglasses Case Pattern
Supplies
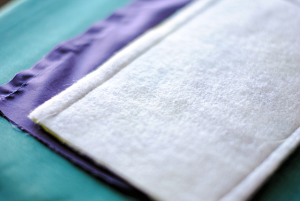
- 1 scrap fabric #1 (outer fabric)
- 1 scrap fabric #2 (inner fabric)
- 1 scraps fusible fleece
Instructions
- Cut your fabric into 7 1/2 inch by 4 1/2 inch rectangles. You will need 4 total, 2 from each fabric.
- Fuse your fleece to the wrong side of your outer fabric. Then cut about 1/2 inch off the length of that one so that it is slightly shorter than your inner fabric.
- Partner each of your rectangles with their matching rectangle. With right sides together, sew around the outer edges of your rectangles, leaving one of the short ends open.

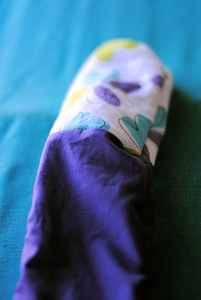
- Turn the inner fabric rectangle that you just sewed right side out and stuff it down into the outer fabric (which is still wrong side out).

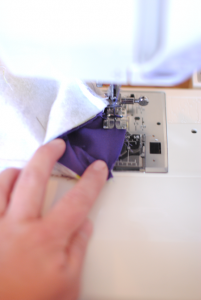
- Match up the top edges and then sew around the top edge leaving a small opening to turn it. Just be careful to only sew through your two layers of fabric at a time. This can be a little tricky-see the image. Stop frequently with your needle down to adjust the fabric if necessary.
- Turn it all right side out and stuff the inner piece down into the outer with just a little edge showing at the top. Press it flat and top stitch all the way around the top (again being careful not to sew through all 4 layers, just the two you want).
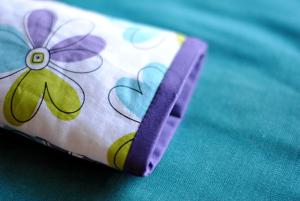
- And you are done! Pretty easy I hope?
You Might Also Like:
Quick and Easy Sewing Projects:


Heather says
Love your tutorials. I am a beginner at sewing and take your projects and make them weekly so that I can learn. Keep up the tutorials! 😀
Brenda Spiekermann says
Hi I’m new. Haven’t seen in years. I love the sunglass case but I don’t understand the assembly. Can you help me please? I just love this case.
Katherine says
Thanks for this tutorial – I have successfully made one and will use up some of my stash to make more. I left the turning opening at the bottom of the liner, sewing just around the corners on each side and back stitching, leaving the other short end open to sew to the outer, as Cheryl said. I then turned it all right side out, closed the turning opening and stuffed it inside, leaving no opening to close at the top. Then it is just top stitching – no hand stitching to close the turning opening.
Amber says
Glad you like the tutorial! Thanks for visiting the blog!
khadija alabood says
OMG.thank you it helped on father’s day he was sooooo happy thank you
Katharine Cunningham says
Hi Amber, I made six of these as gifts for my coworkers, daycare provider and preschool teacher. We don’t have a lot of sun out here in Belgium, all the more reason to protect sunnies while in storage! Due to late night sewing, I couldn’t get the upper topstitching to work, there was a twisted edge at the spot where it’s turned. So I left a small opening in the bottom of the lining, sewed the top all the way around and topstitched the opening closed. Worked out and I got 6 done before my baby woke up. Great project and made the recipients smile. Thanks.
Amber says
So fun to hear that!
Cheryl says
I found that the lining was too short, so would recommend making the dimensions for the inner fabric 8 “x 4.5”
I made the following changes which resulted in a neater top:
When sewing the inner rectangle, leave an opening at the top, as per instructions, but also at the bottom (you can sew a short way round the bottom corners)
Turn the outer piece RSO and stuff it into the inner case which is WSO. Then sew right around the top edges not leaving a gap.
You then turn the case through the bottom of the inner pouch. Before stuffing the inner pouch into the case, topstitch the opening at the bottom closed.
This makes for a much neater top to the case.
Lorrie Kottke says
Hi Amber just made one came out great. The only question I have is the top stitching around the top . I can’t get it around my free arm and trying to stitch from the inside doesn’t seem to line up on the outside. Any suggestions?
Amber says
Shoot-mine fit around my arm. Maybe hand stitch?
Allison says
What if you do not have fusible fleece? Can you substitute something else?
Amber says
Yep-any sort of interfacing should work.
nicole says
hi! is there a way to download to print this?
Leentie Ferreira says
I do community work where we teach people skills to help themselves.
This weeks project will be your sunglass bag! Thanks for your idea’s!
Amber says
Yay! Very cool!
Iren says
Hi! It’s my first time visiting your blog and the first time I touch a sewing machine in years!
I’ve already made your chapstick key chain and wanted to try this project as well. Do you happen to know a good substitute for fusible fleece? I don’t think I can find it in my country. Would regular fleece work with your projects?
Amber says
Yes, or any sort of interfacing.
Audady says
Hey, guess what, Amber: You said making this thing takes only 10 minutes, and I made it in 11 minutes! *sarcasm*
Amber says
Not bad right?!
Mdm Samm says
a lovely lesson thank you
Sheila says
I love, love, love these directions for sunglass cases! Great for using up scraps. Thank you!
Debby says
I was wondering if you remembered the manufacturer of the multi colored polka dot. It’s so cute as a glasses case, and I have a billion little pink dots to chose from in my stash…
Thanks.
Amber says
I got it at http://www.stitchstashdiva.com I thin and it was recently.
kresta says
I have to do this!! I have a few dang cute scraps this would be perfect for.
Anne says
Just what I needed! I’m going to give shades and a pretty sunglasses case to my daughter’s teachers as end-of-year gifts this year. I’ve got a Craft Gossip post scheduled for tomorrow morning that links to your tutorial:
http://sewing.craftgossip.com/tutorial-easy-3-step-sunglasses-case/2014/05/17/
–Anne
Deby at So Sew Easy says
I love 10 minute projects like this. Thanks for the great idea Amber.
Marilyn says
I LOVE to sew too!! I do not have a website as I am somewhat computer illiterate (sp?)! Want to work on that tho. My BIG passion is sewing handbags and purses. I pieced my first quilt this year, but, still need to have it quilted. You have a real knack with your blog! I retired 9 yrs ago and find sewing is what I should have done years ago. Lot less stressful!! 🙂
Margaret says
Marilyn, I’ve cleaned out my quilt/knit room and have lots of unopened purse handles. A few years ago I made felted purses. I could send a picture of them to your email or a Facebook message. Will happily mail them to you for cost of shipping!!
Margaret Walters
Texas