It’s Learn to Sew time for the kids and teens again! Did you get last week’s lesson completed? How did it go? I’m hoping everything went well. Remember to take it at a pace that is comfortable for you and your child. Last week’s lesson and this week’s are the two easiest, so if that’s all they can handle, good enough! You be the judge.

This week we will learn to top stitch and turn. And we’ve got a fabric giveaway from this week’s sponsor… Online Fabric Store:

They’ve got great fabric from apparel fabric to home decor fabric, sewing notions, outdoor fabric, pillows, vinyl, and more. Just check it out for yourself. I can tell you that I spent quite a while browsing through their stuff the other day. Love it!
They’re giving away a $50 gift card this week to our big winner! (Enter at the bottom of this post.)
So, on to the lesson.
Lesson #2: Turning and Top Stitching:
Again, this is basically just the lesson I wrote up in the original series. It’s sort of up to you to take this and teach your child from it.
What do I mean by turning? Very often when you are sewing you are going to put the right sides together, stitch them and turn them right side out. That’s how you sew something without getting a raw seam on the outside. You’re going to use it all the time, so let’s learn how.
I am going to demonstrate this idea with the strap of an apron. In this example, I cut out my straps to the size I need. I then lay them so that the right sides of the fabric (the part that has the pattern-the part that I want to have show when I am done) is on the inside. So that the right sides are touching each other and I am looking at the wrong side.

Then, as you can see in that picture, I am going to sew it together (of course where you are sewing will depend on what you are making. This is just one example.)
Important: You will always need to leave an opening in your sewing of at least a couple of inches. Otherwise you won’t be able to turn it right side out. Typically the pattern or tutorial will tell you where to leave your opening.
Once I am done sewing and have left my opening (in the case of a strap that’s easy-it’s just open at the end of the strap) I am going to start to pull the fabric through the opening so that it is right side out.

Sometimes this will be easy, but when you are working with a small space it can be a little tricky. There are a few tricks to help you poke that fabric through.
First, use something like your scissors or a chopstick or knitting needle to help you push the fabric through:

You can also reach inside the tube and pull from there a little:

Once you get it completely turned you are going to press it nice and flat:

Then, in most cases you will need to sew your opening shut. To do that you will pinch it or press it so that it matches the seam you already had and then stitch it closed. Yes, this will leave a little bit of stitching on the outside of your item. That’s ok-it’s normal. Typically you will put it at the bottom of the project so it doesn’t show as much.
Now, what is top stitching? Top stitching means to sew on top of the the thing that you just sewed and turned. Hence the name top stitching.
There are 2 reasons to top stitch.
1. To hold what you just sewed in place. For example, if you sew the strap to a bag and then top stitch it, the strap will be more sturdy and your seams will stay where you want them instead of shifting around.
2. It can add a nice finishing touch to what you made.
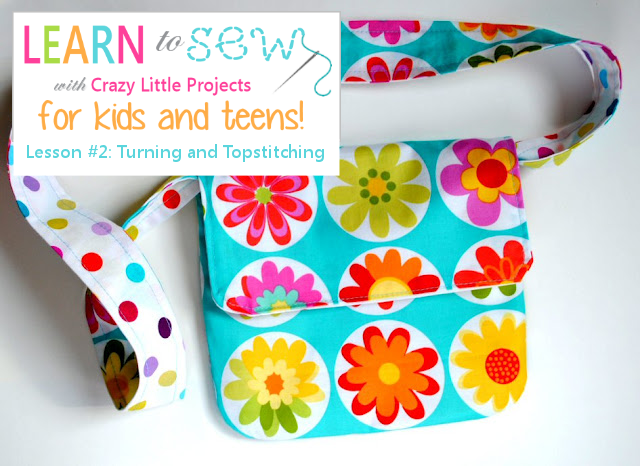
As you can see in this picture I top stitched this messenger bag strap. In this case I did two straight lines just to add a nice look to it.

To do this you are simply going to line up your presser foot once at say a 1/2″ seam allowance and sew a straight line then do it again at a 1/4″ seam allowance. Easy.
Here’s another example of top stitching. This time it’s on another bag (in fact, it’s this week’s project bag) but it’s around the front of the bag:

One more example. This time from my ear warmer headband.

You can use top stitching on anything.
A couple more things to note for this lesson. Sometimes when you are sewing something that will need to be turned right side out, you will be sewing curves. When you sew a curve, before you turn it right side out, it is helpful to make some very small cuts in the fabric that got right up close to (but definitely don’t cut through it!) your stitching. This helps the fabric to not pucker and bunch when you turn it right side out:

See the little cuts in this now?

You can do this for any curves that you sew to help it lay more flat.
So, to practice these skills this week I have what I think is a SUPER fun kids project this week. It’s a mini messenger bag that should be fairly easy to make with a little help from mom/grandma/whoever is helping them sew. Make it with your boys too-they can use it to carry crayons or guys or whatever:

And now for the Giveaway from Online Fabric Store: It’s a $50 gift card to that wonderful place:


Violet Winter says
Forgive me, if I missed it, but what measurements of material are needed? Love your posts!! Thrilled to use them to learn with my daughter how to sew. 🙂
Amber says
Depends on which project. Are you looking at the mini messenger bag? If so, it’s about 1/4 yard of each fabric.
shelli brinson says
I would like to be able to sew my twin girls cute summer dresses and outfits
shelli brinson says
thanks for making this so easy to understand and follow, for not so experienced people like myself. I made two messanger bags for each one of my twins with a little help from my mom and they turned out very well.
Laurie P. says
I really want to make a knit maxi skirt with a yoga waistband.
Katy says
A fun summer apron!
Diana Allen says
Love the bag. I don’t get the time to sew like I use to, and now my girls are getting bigger and would really like to make this (with a little help). So cute!
Melanie says
Smocking!
Savana says
How do I flatten out curves that I serge and turn right side out?
Amber says
Um…I’ve never serged before so that’s a good question. Sorry! I don’t know but I need to learn too!
melle@feathered ruffles says
i think we could both here really use some help with zippers. i can’t really help kidlet until i feel proficient on them myself….
Lynnette says
I have a 12 yr old that has been after me for the last few weeks wanting to learn to sew. This is perfect and very doable for her, and me. Thank you for sharing such great ideas!
Dawn says
Just was able to finish the notebook cover. Turned out okay for a first try – a bit short on the width – due to crazy things I did. I didn’t have a large enough piece, so I sewed scraps together to get the size needed. Love the bag in the next project and can’t wait to try it along with my daughter. I am loving your site as I am fairly new to sewing. Thinking of getting daughters Girl Scout troop on this project.
Christa Dunn (Krebs) says
I would love to be able to sew my own tailored dresses!
Christa Dunn (Krebs) says
Despite being an extremely bright and intellectually gifted 14yr old, my daughter has a surprisingly short attention span for learning new crafting techniques! But we got through it and I honestly think that she will eventually learn to love sewing just like I do (here’s hoping at least!)
Amber says
Love it! 🙂 My mom was always going crazy trying to teach me. I didn’t really learn until I left home but at least she laid the ground work.
addibrae says
I would like to learn to sew a skirt
shelleymay says
loved this week’s project! Thanks for the easy instructions and foolproof manner of breaking this down for not only me but my 8 year old girly!
Rachael C says
I wanted to learn to sew with vinyl (a super cute purse/messenger bag) and also how to quilt!
Hannah says
We now have three very cute little messenger bags at our house! It went great! Everyone was able to do their own sewing with just a little help to sew the strap on!
kimberlee says
I think I want to learn Quilt as You Go
Joanna says
My bag wasn’t as cute as yours due to my poor choice of fabric. I’m learning!!
Colleen Garner says
I am having fun with all your tutorials with learning to sew. The problem I am having is sewing zippers. I dont know why I am having such a hard time with it, I am picking projects using zippers so hopefully one day I will get the hang of it…practice practice practice
Amber says
Just takes practice. 🙂
J. Burks says
This project looks just like the thing we need for the kids to keep their long-trip stuff in the car. They can hang it off the arm rest and always have what they brought in reach!
abby says
just finished! My 11 year old daughter was awesome! Just got a little tricky at the end, attaching the strap. Top sewing sure does show off if you can sew a straight line! Looking forward to Pajama Pants next week.
Amber says
That’s true! 🙂
Colleen says
I just want to learn to sew! 🙂 I’m excited to start the messenger bag with “A!”
Debbie worsham says
I can not wait to make this messenger bag for my granddaughters !
Gwynne says
My daughter loves to carry around old purses of mine so I know she’ll love doing this and having a bag of her own
Cris B. says
I want to learn how to make 6-12 month baby girl dress.
Cris B. says
This week’s project went great!!
Julie says
I love this series! I am not great at sewing, but it is neat to reinforce what I know in user-friendly terms! I would like to learn to do cloth diapers too, those look intimidating!
Karis says
I want to learn to sew cloth diapers 🙂
Delores Wagg says
Can’t wait to try these lessons with my 7 yo granddaughter!
Thanks for the chance to win.
Krsitine R. says
My friend Jen who just got a sewing machine.
D. White says
Let’s just say I hope with time and practice I get better 🙂
D. White says
Going to do it by myself.
Raina DelRio says
I am doing this Learn to Sew series with my 7 year old daughter, Skyler
Raina DelRio says
My daughter has been begging me to teach her how to sew, so this series was awesome. She was so tickled that she was able to sew her first messenger bag (with the help of mom, of course) She has been showing it off everywhere!
Kristina Calkins says
That looks awesome!
Tina Covey says
This messenger bag is so cute. I hope we can make ours look as cute!!
lesley says
myself – i am new to sewing and having a hard time jumping in due to being so intimidated. i have a pile of patterns clipped to the fabric, all ready to go, and i can’t seem to make myself take the plunge. i just have to tell myself if kids can do it, i can do it!!!