What’s the Project? This easy step by step tutorial will teach you how to use heat transfer vinyl for all of your projects! It’s easy and a fun way to personalize your projects.
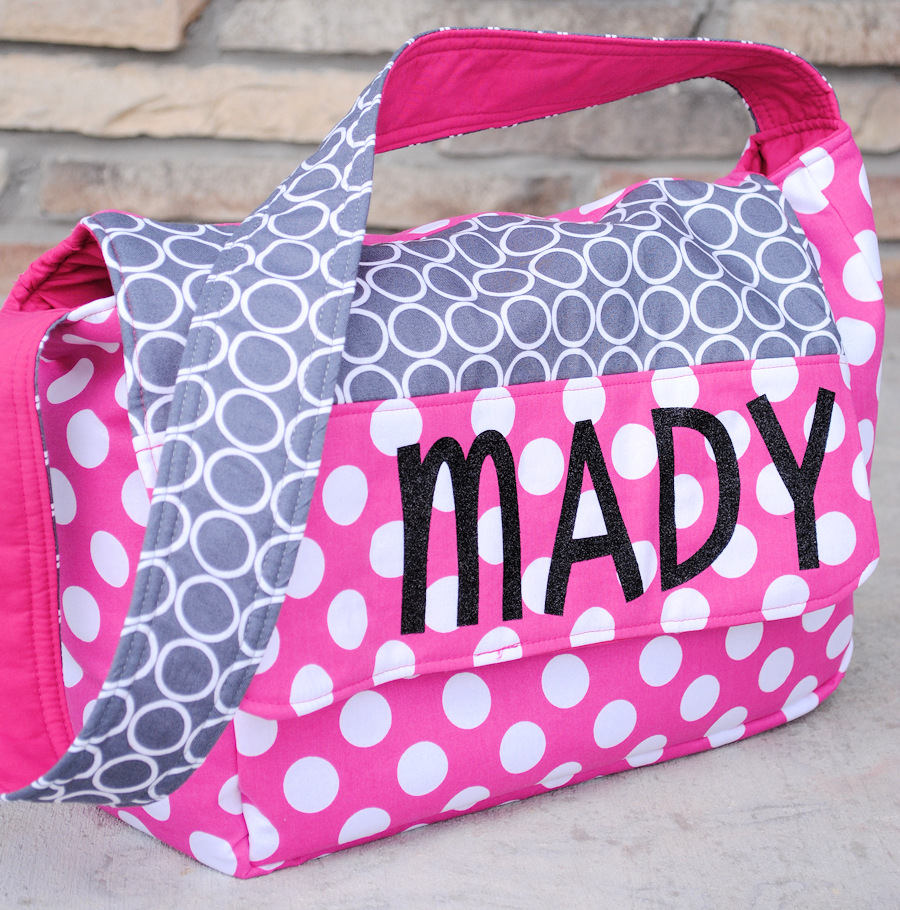
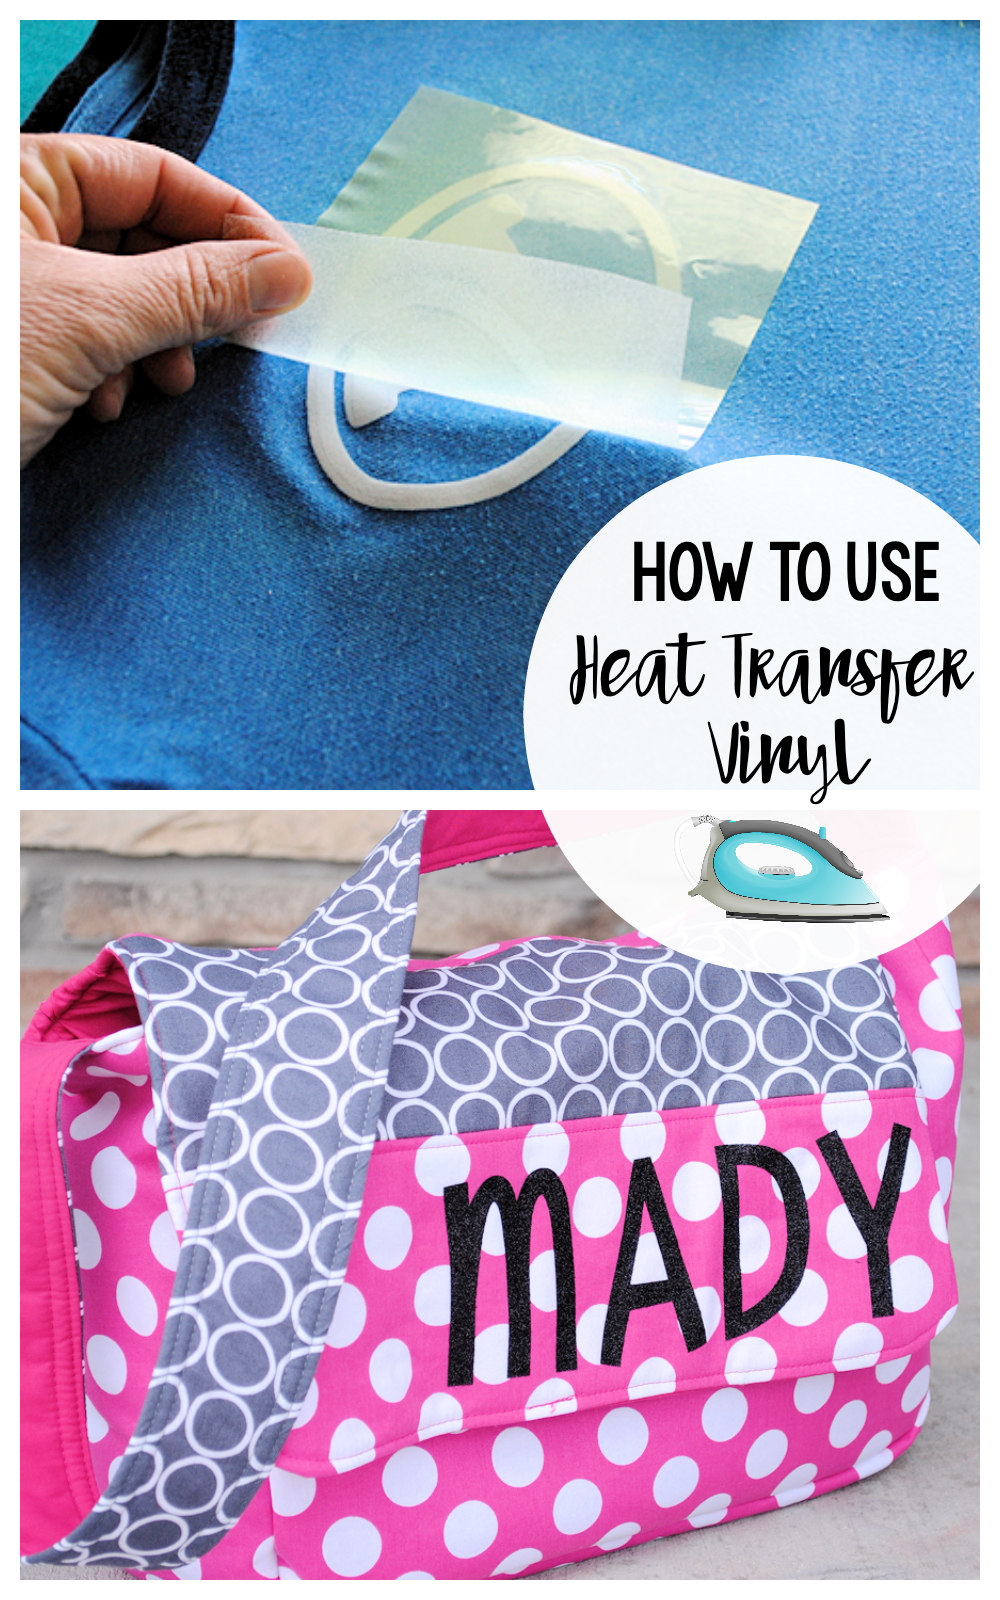
One of my favorite things to do is add vinyl to a project so that I can personalize it. Whether it’s a t-shirt or a bag that I sewed, a pillow or a gift, it’s fun to add personalization. If you’d like to try this, I’ll walk you through how to use heat transfer vinyl. It’s easy to use, but there are a few tricks you need to know. Then you can personalize cute projects like this messenger bag I made!
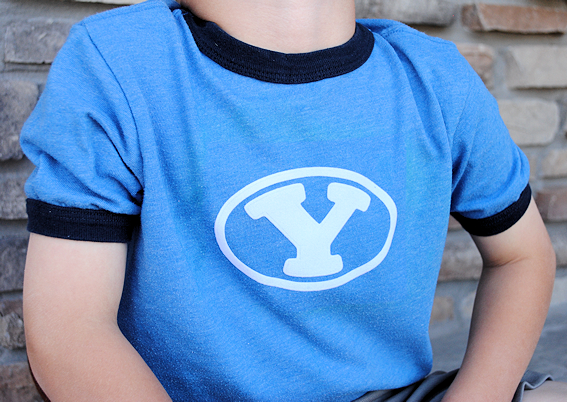
Here’s what I made yesterday-can I get a Go Cougars?!!?

This was just with a shirt that he had already-I just added the logo of our favorite school. (He loves it! He plans to be Cosmo, the mascot someday.)
This cute one was made with glitter heat transfer vinyl which is my favorite!
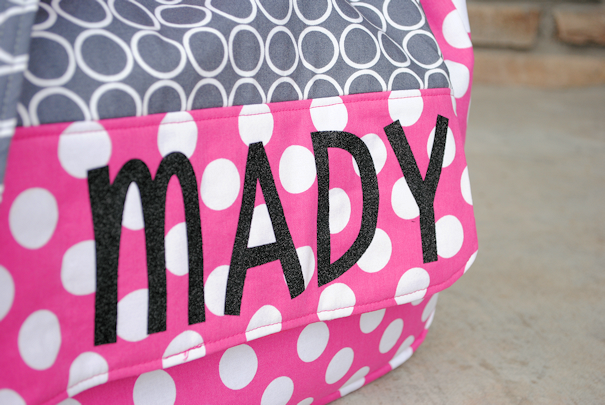
Oh, how I love that little bag. The tutorial for that bag is coming soon, but for now, let’s talk about how to personalize it.
How to Use Heat Transfer Vinyl:
Supplies Needed:
- Heat Transfer Vinyl: There are several varieties-smooth, flocked (sort of fuzzy) and glittery. I got mine here.
- Iron
- Some way to cut your vinyl-I used my Silhouette machine. You can use scissors or an exacto knife if you need too.
- Something to transfer your vinyl onto-this can be anything! Shirts, bags, aprons, you name it!
Instructions:
Start out by cutting your design. **Make sure you mirror image your design. It will transfer backwards from what you cut.**
You want to cut with the shiny side of your vinyl down. I tried to take a picture of this but my camera couldn’t catch the shiny. Just trust me on this-you will see that one side is shiny. Put that side down and cut on the other side.
Once you have your design cut, begin to peel off the pieces that are NOT part of your design:
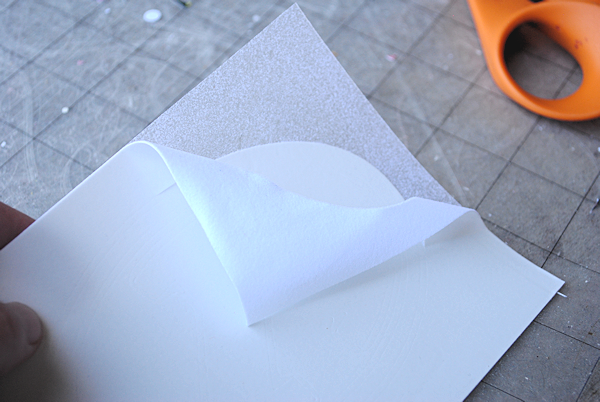
You can use a sharp tool like this Silhouette hook to help if needed:
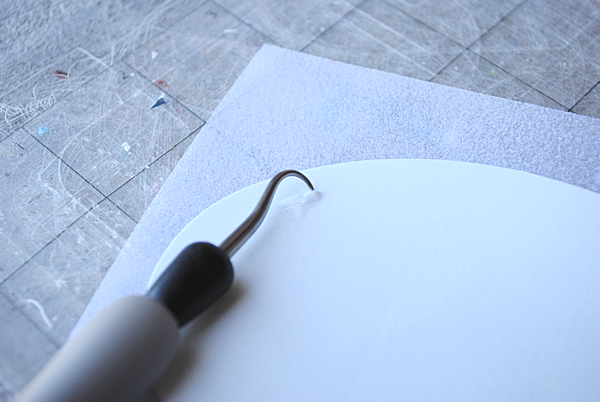
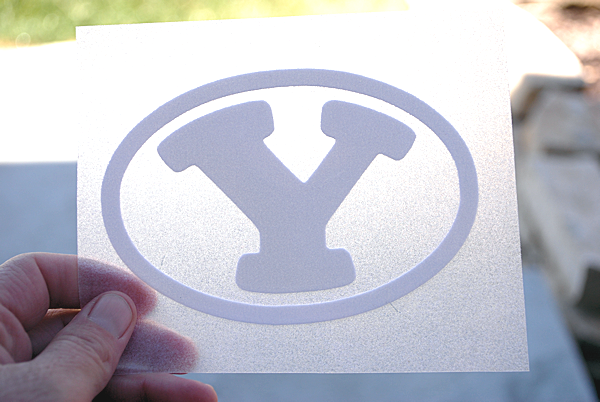
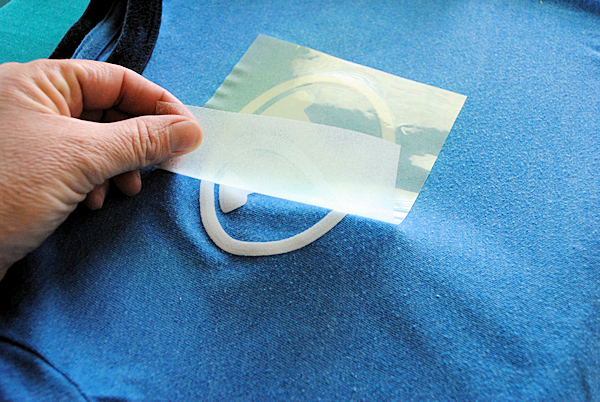
Peel until you have everything removed EXCEPT what you want to transfer:
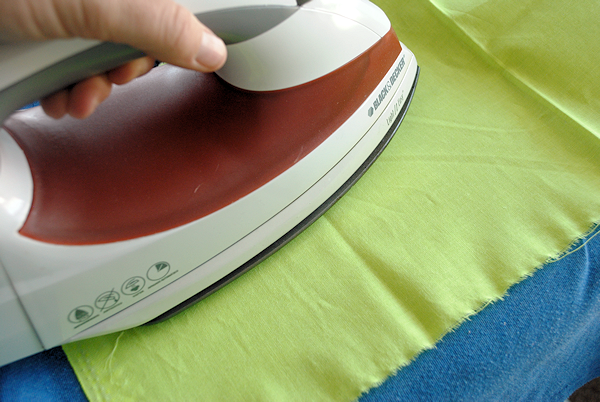
Now, get out your iron and turn it to the cotton setting. Lay your transfer on your item you are transferring to:
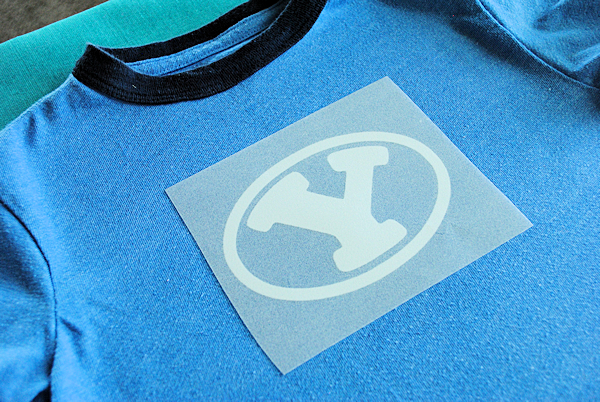
Lay a piece of fabric over it:
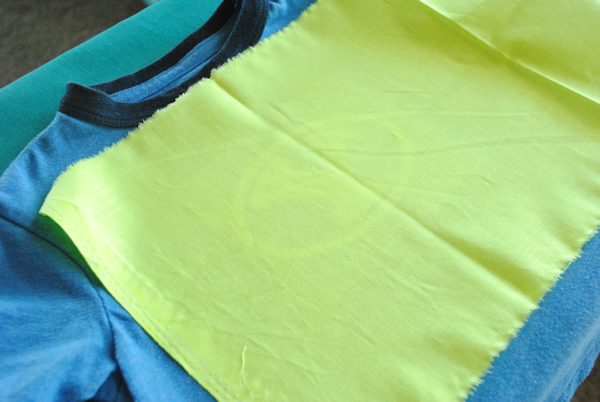
And iron for 60 seconds. If you’re using glitter vinyl it might take a little bit longer.
Let it cool for a few minutes and then gently peel it off. And you’ve got a finished product! I love it! Seriously, it’s so easy and fun!
And my kiddo loved it:

I hope this helped!
You Might Also Like:

Pin It:


Edward says
This looks awesome.. So where did you buy your weeding hook?
Amber says
You can get them at any craft store near the cutting machines.
Suszanne says
Hello, I am a little new to the Silhouette Cameo, but make it a point to learn something daily. However, I tried my first attempt with the Metallic heat transfer and it did not cut through the first time, and I really didn’t see a setting for that particular style of heat transfer, with that it did make it a little difficult to cut my design and then peel the negative away. I really am looking for the right blade setting for the metallic heat transfer, so that , one I cut a good cut through and two I don’t damage my mat and I guess three, I don’t stress over this small stuff, because I am sure I could test and work until I found the right setting, but would love to hear from someone that has used it and knows what they are doing. THANK YOU so much for your time and have a great day.
Amber says
Hmmm I’ve used it with my Cricut successfully but not as much with my Silhouette. Maybe try SilhouetteSchool.com
Erika says
I like very much those designs I used my cameo to make some designs of my own for Halloween also I did some socks with some reflective vinyl for my little ones, I kind o went everywhere, but still looking for a great website to buy I try World-Paper like 3 months ago they were a little bit expensive now looks like they are lower than eBay this is a jewel for all those who nickel and dime to be able to get the most profit
Do you Know about a better one with the prices I’m looking the best price for some siser easyweed I used the gold and the lime a lottt. and I got tired of buying of Ebay and Amazon Delivery time Is a Headache Late Orders Cant deal with it!!
Thanks for your help!
Amber says
I use Expressions Vinyl usually.
Rachel says
I love the look of the glitter vinyl, it looks so pretty. I admit I was a bit hesitant to try heat transfer vinyl, but it actually looks relatively easy. Thanks for sharing the cute projects!
Jarrod says
Lovely idea!
I loved to create my own design using vinyl technique which is so simple that even a kid can do. It doesn’t cost much amount also but gives fine touch of design.
Mary Jo says
Do you think the vinyl would stick to wool if I used a press cloth and cotton setting on my iron?
Amber says
Probably?
zee says
I have everything together but any suggestion on afterward. Its like a 1 time shirt after the wash it the design comes off….
Amber says
I have had that problem a few times too. The things I have found that have helped are to prewash the shirts and then to iron straight on the vinyl after you have it all in place. Like a final setting. It depends on the type of vinyl too. I think the glitter and fancy kinds are more prone to falling off than others.
Kimberly says
I am looking at using the heat transfer to label some of my daughter’s sports jerseys on the inside. Can you see the transfer from the inside of the shirt if it were inside-out?
I know…random question!
Thanks!
Kim
Amber says
Probably not.
Kara says
What kind of vinyl did you use? Did you have any issues with the edges peeling after washing??
Amber says
I get mine at Expressions Vinyl (I think I linked to it in this post). And yes, I have had some problems with peeling off but only with the glitter kind. I have found that if I prewash whatever I am going to add the vinyl to that it helps it stay on better.
Judith says
Hi Amber! Thank you for the tips and pointers you gave here!
I have a question about cutting EasyWeed brand Vinyl WITHOUT a Silhouette or Cricut Machine…I am needing to cut some numbers (approx 8″x 6″ and 4″ x 2″) and want to use scissors to cut them out.
Because there will be no edges of extended tacky clear area surrounding the numbers, How do I ‘stabilize” the numbers so that they don’t/won’t shift during the heat application (using a household iron)?
Could I maybe use a mylar transfer sheet on top of the clear backing on the EasyWeed, I’m thinking this may help stabilize while I apply the heat with the iron, but wonder if I’ll need to increase the timing to compensate for the added layer (mylar)?
Hope I’m clear in my description of my uncertainties! 🙂
Thank you and anyone else who may be able to offer me suggestions or answers!
Judith
Amber says
I have done it without having the backing and just laid the letters in place and then just carefully ironed over it so as not to move anything and it worked. You just have to be really careful!
Amanda says
Would the vinyl work with a heat press machine? (On a low setting?) I know I have seen several places, it is just iron ons. Also, how do they hold up after they are ironed on. I’ve done the iron ons in the past and always been disappointed that they didn’t even last wash or 2.
Thanks guys for educating me.
Amber says
I don’t know about heat presses but I assume so?
Lorrie says
I like the bag did you pre wash it Before ironing the transfer on. I have a bunch of canvas totes that I was planning on doing as gifts and was wonder if I need to prewash them before applying transfer.
I did do a test of a prewashed one and it shrunk a little. But it got super wrinkled and took for ever to get them out. So I am trying to avoid ironing 30 before applying transfer.
Amber says
It is best to wash before but with the canvas maybe not because it does have a problem if you wash!
Jessica says
Hi Amber! I’m making a dress from Crushed Panne Velvet fabric and was wondering if the heat-transfer vinyl would work on it? The fabric is 100% polyester but it says to ‘Press on wrong side only and Steam only’. Could you help me?
Amber says
I am guessing not. You could test it on a scrap piece of fabric maybe though to see
Nancy says
I have the glitter heat transfer but my Silhouette isn’t cutting it. I’ve tried changing settings and blade depth but still nothing. It seems to be just making an impression but not cutting. Last tried with blade depth of 6. Any suggestions!
Amber says
Even higher blade depth or a new blade
Dana says
When using your Silhouette, do you use the cutting mat or just feed the vinyl in the machine?
Amber says
I’ve only done it with my mat but I know you can do it without. I just haven’t tried it.
Jamilah says
Great tutorial! Thanks. Can you share the type of software you used where you were able to print/cut any design that you found on the web?
Amber says
I use a Silhouette Machine.
Libby says
Great tutorial thanks so much!!
Does this really last long without peeling? Can you wash and dry these clothes like normal?
Also what brand of vinyl do you use?
Thanks!
Libby
Amber says
You know, I have never had problems with it before, but did for my first time last week. I think that I didn’t iron long enough on what I was using though because I think it usually works better than it did that day. I get mine from Expressions Vinyl-the link is in that post.
Tisha says
Do you know if heat transfer vinyl will work on other surfaces if you use a heat gun? (i.e. acrylic tumblers, glass, etc.)? I’ve only been able to find animal print vinyl in heat transfer not regular adhesive. Thanks for the tutorial!!
Amber says
I don’t know but they have sticky adhesive that you could use.
Heidi T says
Great job! Where is the bag from? My daughter would love that. 🙂
Amber says
There’s a tutorial for that here: http://crazylittleprojects.com/2013/07/personalizedkidsmessengerbagtutorial.html
kate says
what blade thickness do you use for the glitter? i keep finding it is cutting through my backing as well.
thank you
Amber says
Hmmm it’s been awhile so I can’t remember but I think it cut through my backing too and I just used it that way
Shelby says
Hi Kate,
I know you posted this a couple of months ago but I found machine settings through where I buy my vinyl (ExpressionsVinyl) here is the link!
http://www.expressionsvinyl.com/machine-settings.html
Shelby
Jenny says
Hi Amber,
What a fun project! Can you tell me where I can purchase the “Y” logo? I can’t find it in the silhouette store. Thanks!
Jenny
Amber says
I have the designer software that allows you to find any image online and cut it
Hope says
What is the name of that software?
Thanks!
Amber says
I used a Silhouette machine
cathy says
where did the letters come from? did you make your own? not sure what to do,can you be more specific?
Amber says
Yes, I cut mine out with my Silhouette machine.
Mandy says
This is another great place to get heat transfer vinyl, they sell a couple of brands (prefer the siser easy weed), and it every color and finish (flocked, glitter, metallic, etc.), and they ship pretty quickly. http://www.hhsignsupply.com/productcart/pc/Heat-Transfer-Vinyl-Material-c335.htm Also, if you are in Utah and don’t want to ship it, Regional Supply off of 3300 South sells it by the sheet for a decent price.
Mandy says
I have done this with my cricut for years, but I feel like it’s hit or miss. About 70% of the time it works great, but if you iron too long it melts and warps your design, and if you don’t iron long enough your design will peel and not wash well. Any helpful hints for that, or is it just me? 🙂
Amber says
I had a few problems too. I noticed that I needed my iron to NOT be on the highest setting. More of a medium setting. Then I could iron for longer without it warping.
Carrie Hannah says
Thanks for the cool tutorial. Keep it up. You have great posts.
Stephanie says
I was wondering if you could use some of these products with the Cricut machine? Or if you knew of any other sources for heat transferred vinyl? This is a great project and so versatile. Thank you
Amber says
Yes, definitely-with a Silhouette, a Cricut or even with scissors or an exacto knife. I’ll add some more sources for the vinyl next week so check back. 🙂