What’s the Project? Need to learn how to make piping for all your sewing projects? Follow this easy sewing tutorial to learn how to sew piping and you can add it to pillows, cushions and all of your fun sewing projects.
Have you ever used piping in a sewing project? It’s a tiny little accent but it adds a nice flair to something as simple as a pillow or a cushion.
And guess what? It’s actually super easy to make. Learn how to make piping today with this simple, easy to follow tutorial.
It’s fun and easy and you can do it! Then you will want to add piping to all the things!
How to Sew Piping:
Supplies Needed:
- Fabric-long and narrow strips cut about 1 and 1/2 inches wide (you can also use bias tape-just iron it flat)
- Cording (choose a width that is the size you want your piping to be) You should be able to find this by the yard at the fabric store.
How to Make Piping Instructions:
Cut your fabric into strips that are about an inch and a half wide. *Note-these should be cut on the bias. Your piping will work much better that way. You technically can do it any way you want, but on the bias is the preferred method. (Don’t know much about the bias? Check out my ebook.)
Place your cording in the center:
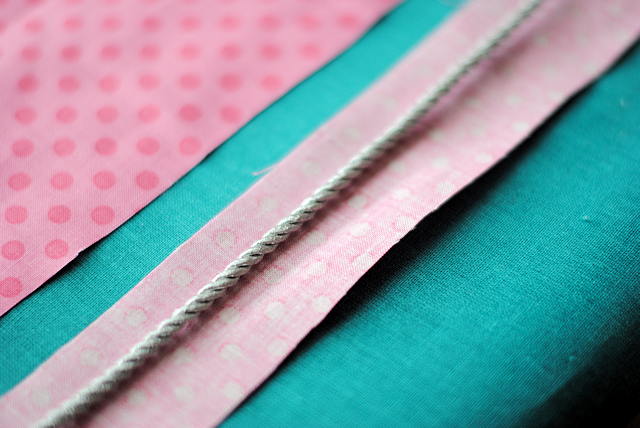
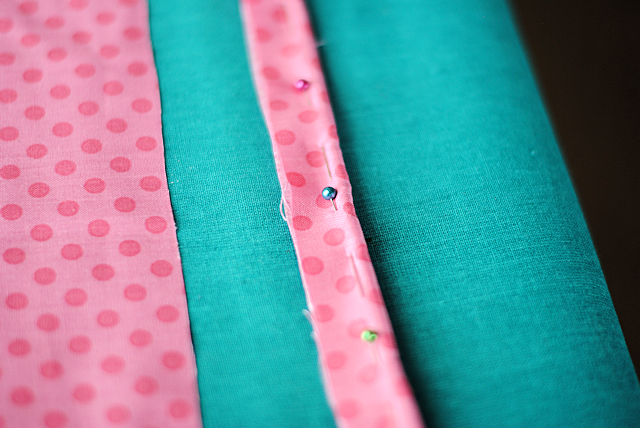
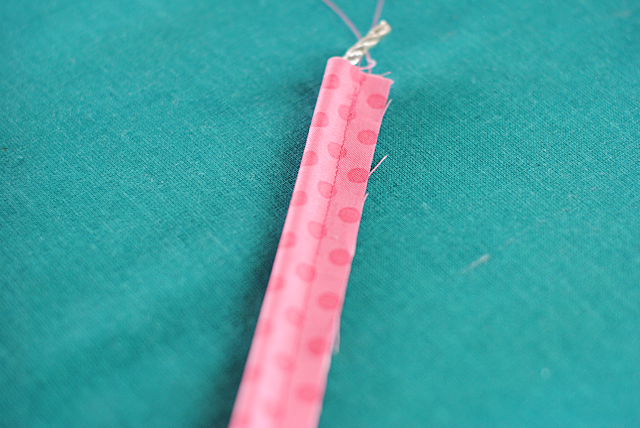
Fold the fabric in half over the cording and pin it:
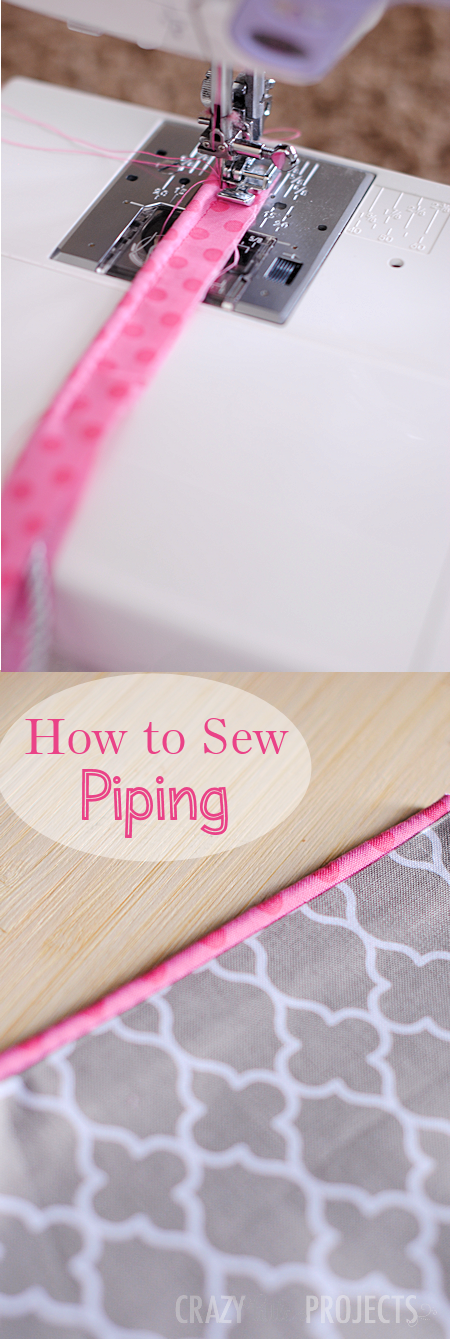
Put your zipper foot on your machine and move your needle as far to the left as you can (or to the right if you prefer to sew it that way). Sew along the cording as close as you can get to it:
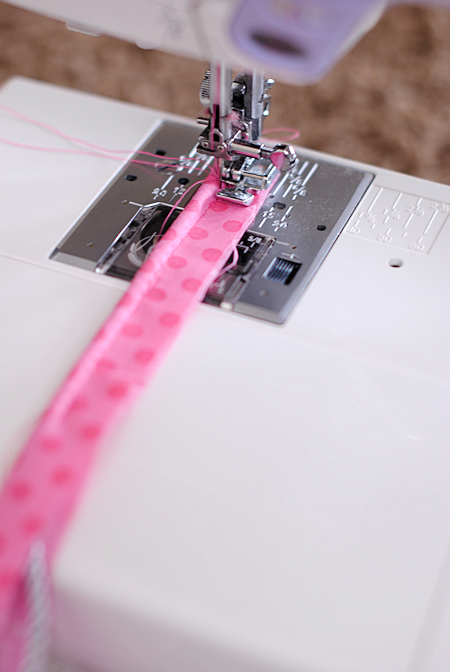
And that’s it! You’ve got piping! (Your stitching will actually be closer to the cording than in this picture.)
To sew it into your project you want to pin it along the edge of your fabric like this:
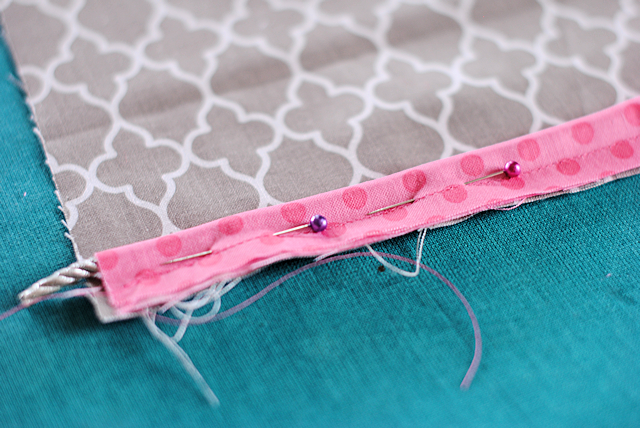
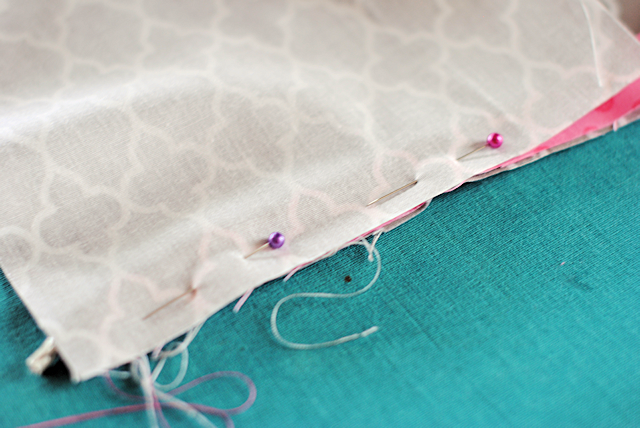
Best practice is to sew a straight line along there to keep the cording in place. Then, place your other fabric over the top and sew just like you normally would (to make for example a pillow):
What can you make with piping? Pillows, blankets, cushions, crib bumpers, bench pads, you name it! Just have fun with it! It adds so much flair. I hope this helped you learn how to make piping and you have fun sewing all the things!
You Might Also Like:
11 Sewing Hacks You Need to Know:
50 Sewing Tips for Beginners to Pros:
Pin It:


heidi addlestone says
Would you please demonstrate how to apply piping around a corner on a Childs dress?
Dee Bell says
Good tutorial, thanks. I have done piping before. I still struggle with corners and aligning the ends.
Valmai says
Thank you for sharing your knowledge with us, we appreciate it. I am still learning day by day.
Silvia says
Thank you! Just what I was looking for. 😉
Cheryl says
Karen, your sundress piping may need understitching on the facing. That wil pull the seam with the piping slightly to the inside, which may assist in the piping lying flat. it may also be that using a smaller cord would sit better on a neckline.
Oluchi says
Thank you for your great lesson.
Karen Redick says
An even better foot is a pintuck foot that matches the size of your cord. For baby and young child clothing, I like to make baby piping with cord much smaller than normal. It gives a nicer, finer look.
Another great tip that I came up with – if you need to make piping out of a sheer, colored fabric, use embroidery floss that matches the fabric, instrad of the white cording.
Karen says
Thank you for the great tutorial on French piping. So I made my own piping and used it on the neck and armholes of a sundress. The only problem is that it won’t lay flat, in that the neck piping doesn’t lay flat against my skin, it kind of sticks out. I have snipped the inside curves thinking this would help. Can you give me your opinion as to why the piping won’t lay flat. Is there something I could have done to eliminate this problem? Thanking you in advance.
Amber says
Did you do it on the bias?
Shirley E. says
Karen, did you ever get the piping to lay right on your sundress, mentioned here? I’ve had things stand up because they were just a bit too long for the curved edge. To add something that sticks out on an inside curve and lays flat (as one with the fabric), it needs to be pulled just a tiny bit as you sew it on. This makes the seam allowance shorter than the seam allowance of the garment (or other item), but that seam allowance edge needs to be clipped and/or trimmed to lay flat anyway. If you got the whole piping thing, congratulations. If it still eludes you, maybe this will make a little sense and encourage you to try again. It’s worth it for the lovely finish it gives.
Barbara says
This was hands down the BEST tutorial on how to make and sew piping! Thank you! I have pinned this and will be forever grateful:+)!!
susan says
i am making cushions for outdoor furniture.
can plain rope be used for piping instead of purchasing the cotton cording?
i need a total of 80 yds and it will be pricey to buy the cording.
Amber says
Sure!
hvu says
Very easy techniqie. Thanks for sharing. I will try this.
Nikki says
Thanks for making this look so easy! I will definitely give it a go. 🙂
Donna says
Thank you.
My Handmade Space says
I like custom made piping because you can use all kind of fabrics to make your projects more interesting. It is lot easier with a piping presser foot.
Louise says
My piping came out great! It wasn’t even hard. I don’t mind doing it again!
Marjorie G says
Thank you for your help! This post is very useful to me right now!
Susanna says
Great tip!
Will do this!
Thank you.
Midian says
Obrigada Amber..Beijos….
Beverly Rutherford says
A friend just gave me two adult size shoe boxes full of bias tape in various colors. I wondered what I was going to do with it all. Now I know I’ll be using a good share of t for piping in many projects. Thanks for the tips.
Beverly
Louise Allen says
My piping came out great and my cushions look good. I was worried I’d run out of piping, but I had about one yard left.
Sharron sturgeon says
Very helpful thank you .
Leslie says
Amber,
it takes 1/2 yard to make 5 yards of piping, don’t forget to cut them on the bias
Louise says
I need to make 22 ft of piping, but don’t know how much fabric to buy.
Amber says
You can cut strips and sew them together, so you don’t need a ton. Cut your strips just an inch or two wide.
Louise says
Thanks, I’ll try one yard and get more if I need it.
Anita says
In a college sewing class we learned a technique called “continuous bias”. It is not difficult but too involved to explain here. Google it and you will find clear instructions with photos. It will make you “miles” of bias without wasting fabric. Hope it goes well for you!
Louise says
Thank you so much. I will Google “Continuious Bias”
Patrick says
https://www.youtube.com/watch?v=PZUJknZ6aC0#t=954.77527833
continuous bias tutorial here for you all
Cathy says
I found a tutorial on Pinterest about making continuous bias strips from a square piece of fabric. Have to read it a few times to make sense, but is very simple when you figure it out. It has you draw the lines to make the width you need, but on the second piece I just eyeballed it and they came out fine. Saved many minutes of tedious marking!!! Happy bias tape making!,,
Marnie says
The only thing I would add, especially if you are sewing on heavier home dec fabric, is to not sew as close as you can when you are making the piping. Otherwise when you add the two layers of fabric that you are sewing the piping between, your needle may never get as close as the first stitching and your origional stitches may show.
Otherwise great pics and tutorial.
Amber says
Good point!
Fee says
in your picture when you are first sewing the piping cord into the Fabric you are using a zipper foot as opposed to a normal foot, I’ve found that using a zipper foot (or you can get a piping foot if you are a purest) gets you much closer to the piping cord for a snugger fit then you can sew on whichever side is easiest for you easier? X
Amber says
Yes!
Rachel says
hi
I’m a complete novice to the sewing world and have only managed bunting ( by the mile for friends and family) and a basic cushion cover. My aim this year is to learn lots of new techniques, and I think the first will be this pipping. You’ve made it look so easy and unscary.
Thank you
Heidi S says
Thank you so much for this tutorial! It makes piping soooo much easier than i was making it. 🙂
Peanuts & Thread says
Thanks for the tutorial. I’ve been sewing for a while now and recently starting the home home decor stuff and many tricks that are hardly mentioned in these tutorials sometimes make all the difference. Nice job! Thank you!
Jill says
In the last step when you sew the piping between the layers do you still use the zipper foot, or a regular foot?
Amber says
Either but the zipper foot will help you get a closer seam.
Amy B says
Wow! Thank you so much for this tutorial! I am so excited
To
Try this one out when I make my pillows soon! I wasn’t even going to attempt piping until now 🙂 I just have one rookie question! If I want to go all around the pillow is it just one consecutive pipe or four little ones? :/ if that makes sense? :))
Amber says
Yes, just turn at the corners so that it is just one
Leslie Slavens says
The machine and foot one uses makes a difference. What is your machine may I ask?
Amber says
I use a nice janome
Joan says
Can you tell me how to turn a corner with piping and how to join two ends? (Both techniques are necessary, I think, for piping a pillow on all sides.)
Amber says
Go turn corners you just do the same thing as normal but guide it carefully around the corner making sure to leave enough piping in place that it doesn’t pull the corner. Then at the end you will pull part of the piping behind the other just for a little ways so that it overlaps just a little and then tuck it in to the pillow.
mitzi says
To ease corners,sew to where you want to turn,back stitch a few stitches ,clip to the stitching of the cording ,turn your work stitch ,
a few stitches ,back stitch a few and then continue sewing
Carolyn says
Can’t wait to try it!! Instructions are very understandable
alisha says
What does cut on the bias mean?
Amber says
The bias is the diagonal of the fabric
Marie says
I am so excited! I always thought piping was much more difficult and now I think I can actually do it! Thank you!
Sheila says
I cannot wait to try this! The very first time that I learned to make binding, my instructor taught bias-binding. It is the ONLY way that I have ever made binding. I love it! So, making the piping on the bias will not scare me at all. Great blog and great follow up comments! =D
JHanna says
I am adding a link to my blog post today! Thank you so much for sharing this tutorial!
Embroiderymad says
Thank you for the great tutorial, I have a project in mind for using piping.
Maria says
Do u remove the rope or keep it in??
Amber says
Keep it in.
Peg says
Ok, thanks to your great tutorial, I’m going to try it again! Seems my zipper foot never gets close enough, because I was going from the other side. Thanks!
Susan says
I am a complete novice at piping and have only attempted it once. I owe a debt of gratitude to all the bloggers, like yourself, that give us the courage to try new skills. Thank you for that! I found a great tutorial on cutting on the bias and not wasting a spec of fabric and another that has great pics for how to finish off your piping, such as on a pillow. Hope you don’t mind me adding them to further the courage you gave us to add detail to our projects. It’s all in the details!
http://www.positivelysplendid.com/2012/01/piping-tutorial-bee-happy-pillow.html
although it is bias tape, the same premise applies:
http://prudentbaby.com/2010/05/hot-mess/tips/how-to-make-bias-tape-2/
Joyce says
Piping makes a nice compliment on a quilt (on long stretches such as around the sashing, etc.).
Stephanie says
I *always* avoid projects with piping as I could never work out how to get it right … Too baggy, too uneven … Grrrrrr. Thank you so much for posting this, it looks so much simpler, and so effective. Thank you thank you.
Now where is that cording, I feel the need to pipe something …
Amber says
After my most recent project I am feeling like you do about piping. I didn’t do so well.
CM says
I too, am a 50+ year seamstress and I agree with Terry, the fabric must be cut on the bias even if it is piping for a straight line item. The art of sewing has a set of guidelines, or rules, if you will. There is nothing scary about cutting on the bias. Teach that principle and your students will thank you and love you forever. Your sewing looks beautiful and I’m sure many
folks love and appreciate your excellent
work. Stay on the sunny side, even when it
means mentioning the parts of sewing that
can be challenging to some. My mom was
also an incredible seamstress, I was, sadly,
reluctant to pay attention to the details she
knew would make me an excellent seamstress. I do however remember
watching her sew and confess she COULD make a silk purse from a sow’s ear. Love you for being a dedicated mom!
Blessings,
CM
Amber says
You’re right that it should be done that way. I will add that in. I just completed a project that I created my own piping for and I didn’t cut on the bias because the fabric was striped and I needed to use just one color. It worked fine but I am sure it would be better done on the bias.
Terry says
I have been sewing for almost 50 years and the thing a lot of people don’t know or forget, is to always cut the strips for making piping on the bias of the fabric. This will allow the piping to ease at the corners without the puckering that using fabric on the straight edge does.
Amber says
True, I should add that. But as soon as I say the word “bias” I know people are going to freak out a little. 🙂
Lynn Gee says
I have a couple more tips.
#1 – If you can get a cording foot for your sewing machine, it is well worth the expense. I have three sizes for my commercial machine and use all three of them all the time. I also make my cording first, then switch to a zipper foot and attach it as described below
#2 – If you have trouble with the cording puckering or the fabric puckering (which will cause it to be shorter), sew with the cording on the bottom. The feed dogs pull the bottom fabric through faster than the top layer that glides more smoothly under the pressure foot. Putting the cording on the bottom, causes it to be eased just slightly and will give you a much nicer finish. (I’ve never tried sandwiching it and sewing it all at once.) This method does require two rows of stitching to attach all layers, but it has always worked well for me. You can usually feel where the cording is without too much trouble. Just run it as close as you can get it to the presser foot. If it is not close enough to cover the stitching on the cording, try to get it a little closer when you attach the second piece of fabric.
Hope this makes sense!
Jenn says
I thought piping was much harder than this. I was told I needed a piping foot. You make it look so easy. Pinned this and definitely will try my hand at this soon. 🙂
Bonnie Spielman says
Piping can be any size, depending on the size of cord you use. Piping can be called piping, cording, beading. It is really easy and a zipper foot is really the only foot you need.
Carmen says
I’m a total newbie but this is my next project and the last couple pictures confused me 🙁 so it looks like you’d want to sew the piping on the other way? but then you pin fabric on top and sew again? Do you then fold the fabric some way to show the piping?
Wonderful site, by the way and I’m LOVING all the great tips I’m learning 🙂
Amber says
You pin it on the way shown and sew along the raw edge (the edge you cut) then layer the other fabric on and sew again. Once you turn it all right side out it will be just where you want it.
Holly isaacs says
Can’t wait to try this!
shannon says
Oh my goodness! I’ve assumed pipping was super tough so hadn’t yet tried it, but wow you make it look so easy. Thank you!
Katherine says
I had too assumed it would be tough! You make it look sooooooo easy! Thank you!
Claud Sparks says
I found a similar piece sometime ago. I don’t think it was by this person. However it is very simple and fast. If an old cowboy, retired needing to keep his hands busy can do it, you can too.
Jack Shannon says
I only wish it showed how to join two pieces together.
But, that said, it was a good tute..
Jasmine says
Jack, I would assume if you want a longer piece of piping you would just sew the ends of fabric together until its long enough then place the cord in the middle and sew it up as the instructions above say. Hope this helps!
Bonnie Spielman says
You join more strips together by placing the end of one strip face up and one face down on top forming a L or corner. Sew across those on the diagonal from corner to corner. Trim off excess leaving about ¼ inch. Press seam open. I wish I could post a picture but I do not see any option to do that.
Rose says
Thats correct Jasmine.
Mitchell says
With the proper pressure foot ,you will line up against the cord, on the top of material. From there you can see how to sew piece and material together . Happy sewing . PS cann’t do with a regular pressure foot